
Pruning
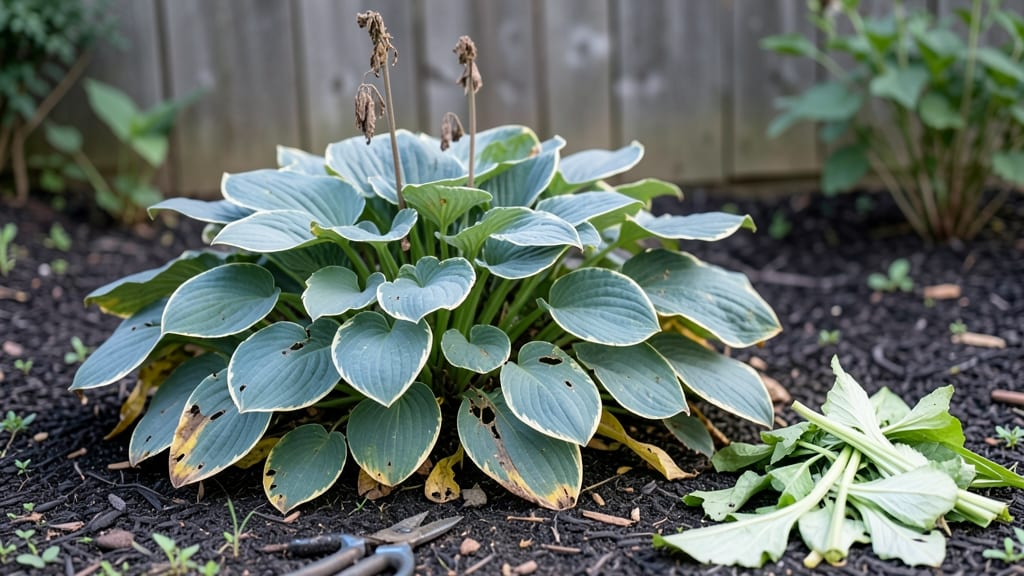
Cutting back hosta plants after the first frost—around mid-October in most zones—is the secret to protecting them from winter damage while keeping next year’s foliage lush and vibrant.
Hostas are the backbone of many shade gardens 🌿, but knowing when to cut them back can mean the difference between vibrant growth next spring and struggling foliage. Timing matters—do it too early, and you risk pest infestations; too late, and you may harm the plant’s winter resilience.
In colder climates like USDA Zone 6a, wait until the ground freezes to trim, while milder regions can handle cleanup a bit earlier. The key is removing dead leaves before they harbor slugs or fungal diseases, but never so late that new shoots emerge in the cold.
Below, I’ll walk you through the exact steps, the tools you’ll need, and how to spot when your hostas are ready for their winter haircut—plus the mistakes that could leave them weak come spring.
The ideal late fall timeline for cutting back hostas
Hostas thrive in partial shade but need careful timing when it comes to late fall pruning. Cutting them back at the wrong time can stress the plant or invite pests.
The key is to wait until after the first hard frost has browned the foliage but before a prolonged deep freeze sets in. This window ensures the roots remain healthy while removing dead foliage that could harbor diseases like slime mold or leaf blight.
In cold climates (USDA Zones 3-5), aim to trim hostas within 1-2 weeks after the first frost—typically late October to early November. For mild winters (Zones 6-9), you may have until December, but don’t wait too long or the plant could suffer from winter dieback.
The goal is to clean up the garden without disturbing the dormant roots.
Why timing matters: Cutting too early leaves hostas vulnerable to slugs, snails, and fungal spores that thrive in damp, decaying foliage. Waiting too late risks damaging the crown or encouraging new growth that won’t survive winter. The perfect window balances disease prevention with root protection.
Before you grab your shears, check for disease signs like black spots or mushy stems. If your hostas look healthy but just wilted after frost, you’re ready. For heavily diseased plants, bag the debris immediately—don’t compost it—to prevent spreading pathogens to next year’s garden.
Regional adjustments: Gardeners in Zone 4 or colder should act fast; ground freezes can happen by late November. In Zone 7 and warmer, you might have until January, but monitor weather forecasts. A hard freeze (below 20°F) signals it’s time to prune, even if leaves aren’t fully brown.
Now, let’s break down the exact steps and tools you’ll need for a clean, stress-free pruning session.
| Climate Zone | Ideal Pruning Time | Key Trigger | Tools Needed |
|---|---|---|---|
| Zones 3-5 (Cold Winters) | Late October–Early November | After first hard frost (foliage browned) | Bypass pruners, gloves, compost bin |
| Zones 6-7 (Mild Winters) | November–December | Before hard freeze (below 20°F) | Shears, disinfectant spray, trash bags |
| Zones 8-9 (Warm Winters) | December–January | Leaves fully collapsed (no green) | Sterilized pruners, mulch |
| All Zones (Disease-Prone Areas) | ASAP after frost | Black spots or slimy foliage | Disinfectant, sealed trash bags |
Start by cutting back hostas to within 1-2 inches of the soil line. Use clean, sharp shears to avoid tearing leaves, which can create entry points for pests. For large clumps, consider dividing them now—just be gentle to avoid damaging the crown.
After trimming, apply a 2-3 inch layer of mulch around the base to insulate roots and retain moisture.
If your hostas show signs of fungal diseases, like dark spots or a slimy texture, don’t compost the debris. Instead, place it in a sealed trash bag and dispose of it in the yard waste.
This prevents spores from overwintering and infecting next year’s plants. For healthy foliage, you can compost it—just avoid adding it to active garden beds until spring.
After pruning, take a moment to inspect the crown. Remove any mushy or discolored tissue with a sterilized knife, then dust the area with fungicide if needed. Healthy crowns should feel firm and smell earthy.
If you notice slug trails or chewed leaves, consider adding copper barriers or diatomaceous earth to protect next year’s growth.
Finally, resist the urge to prune hostas in early fall—this encourages new growth that won’t harden off before winter. Similarly, avoid cutting back in early spring; let the plant’s natural cycle guide you.
The late fall window is your best bet for neat, disease-free gardens and vigorous regrowth in spring.
With the right timing and tools, cutting back hostas becomes a simple task that sets the stage for next year’s lush foliage. Mark your calendar for the first frost date in your area, and you’ll be ready to tackle this seasonal chore like a pro.
Signs your hostas need cutting back before winter
Your hostas may look stunning all summer, but by late fall, their foliage health tells a different story. Ignoring these warning signs can lead to disease buildup or weakened roots before winter.
The key is to act when you see yellowing leaves, fungal spots, or pest damage—these are nature’s way of saying, "It’s time to tidy up!"
Not all hostas need the same level of pruning. Some varieties benefit from a partial trim to remove only the damaged parts, while others—especially those with severe fungal infections—require a full cleanup. The trick is assessing each plant individually.
For example, a healthy hosta might only need dead leaves removed, while a struggling one could need everything above the soil line cut back. Let’s break down the visual cues that demand your attention.
Never trim hostas before the first frost—this stimulates new growth that can’t survive cold snaps. Instead, wait until after the first hard frost (when foliage turns brown or crispy) but before hard freezes (below 20°F). In mild climates, aim for late November to early December. If you’re unsure, check your USDA zone: Zones 3-5 should prune by mid-November, while Zones 6-9 can wait until December.
One of the most obvious hosta pruning signals is yellowing leaves that refuse to turn brown naturally. This could indicate nutrient depletion or early-stage fungal issues.
Run your fingers along the leaf edges—if they feel slimy or mushy, that’s a red flag for slime mold or leaf spot. In this case, remove the affected leaves immediately and sterilize your pruners with rubbing alcohol to prevent spreading.
Even if the rest of the plant looks fine, partial pruning now can save it from a full-blown infection by spring.
Fungal spots—those ugly brown or black patches with irregular edges—are another clear sign it’s time to act. Fungi like anthracnose or rust thrive in damp hosta foliage, and leaving infected leaves can turn your garden into a spore factory. Grab your clean pruners and snip off only the damaged sections, leaving at least 1 inch of healthy tissue. For severe cases, consider full pruning and disposing of the debris in the trash (not compost) to avoid reinfection.
Pests like slugs, snails, and hosta borers also leave telltale signs that scream, "Prune me!" Look for chewed leaves, silver slime trails, or tiny holes in the foliage.
If you spot these, don’t just trim—the remove all debris and consider adding copper barriers or diatomaceous earth to protect next year’s growth. A light pruning now can also encourage the plant to redirect energy to root strengthening before winter.
Finally, if your hostas are overcrowded or their leaves are touching the ground, it’s time to thin them out. Wet foliage stays damp longer, creating the perfect breeding ground for fungal diseases.
Use this as an opportunity to divide clumps if needed—just be gentle to avoid damaging the crowns. After pruning, add a 2-inch layer of mulch around the base to insulate the roots and keep moisture levels steady.
This simple step can make all the difference in next spring’s growth.
By learning to read these hosta health signals, you’ll not only keep your plants looking their best but also protect their long-term vitality. The goal is to clean up without overdoing it—your hostas will thank you with lush, vibrant foliage come spring! 🌿✂️