
Pruning
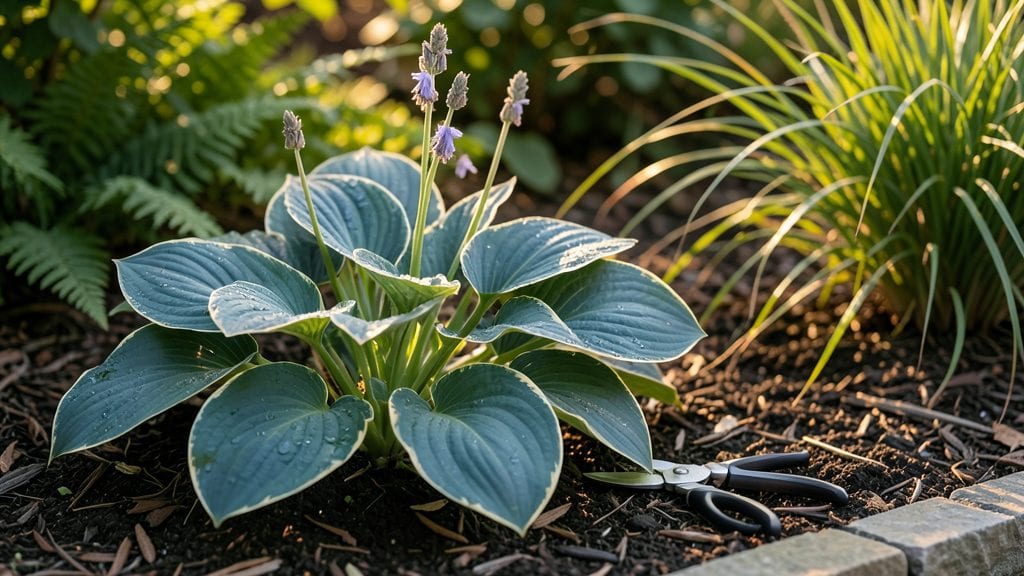
Deadheading hosta plants might seem unnecessary—until you see how it transforms your garden. 🌿 I spent years watching my hostas put all their energy into spent blooms instead of those thick, velvety leaves everyone admires. The secret is redirecting that energy back to the foliage you actually planted for.
All you need is a sharp pair of pruners, a sunny afternoon, and about 10 minutes per plant. Snip off the flower stalks right where they meet the leaf base, and watch your hostas respond with broader, deeper green growth.
This works year-round, though late summer is the sweet spot for maximum impact.
By redirecting energy to the leaves, you’ll end up with plants that look like they’ve been pampered all season—thicker, glossier, and more resistant to pests. The before-and-after difference is shocking, especially when you compare last year’s straggly hostas to this year’s lush clumps.
Even if you’ve never deadheaded before, hostas are the perfect plant to start. They’re forgiving, and the results speak for themselves. Here’s how to do it without a single brown leaf in sight.
📚 In This Guide
- What you need
- Instructions
- Tips and common mistakes
- Wrapping up and next steps
What you need
- ● Pruning shears or sharp scissors: Choose bypass pruners (for clean cuts) or bypass hand pruners (for smaller stems). Ensure they’re sterilized (rubbing alcohol wipe) to prevent disease spread.
- ○ Gloves (optional but recommended): Wear gardening gloves to protect against blisters or irritation from hosta sap or soil.
- ● Disinfectant (70% isopropyl alcohol or bleach solution): 1 part bleach to 9 parts water for sterilizing tools between cuts.
- ● Trash bag or bucket: For collecting spent blooms and debris. A 5-gallon bucket works well for larger batches.
- ● Watering can or hose (with gentle spray): To hydrate plants post-pruning and reduce stress.
- ● Compost bin: Repurpose deadheaded blooms as nutrient-rich compost.
- ● Garden kneeler or stool: For comfort if deadheading large hosta patches.
- ● Plant food (balanced fertilizer, 10-10-10): Apply after deadheading to boost regrowth.
- ● Mulch (shredded bark or straw): Helps retain moisture and suppress weeds post-pruning.
Instructions for deadheading hosta plants
Here's how to keep your hostas thriving with simple, effective trimming.
✂️ Step 1: Identify and Remove Spent Blooms
Start by locating the flower stalks that have finished blooming. Hostas typically produce upright stems with clusters of small flowers—these are your targets. I wait until the blooms look wilted or browned, which usually happens a few weeks after flowering. This ensures the plant has already put energy into seed production, so removing them won't waste potential growth.
Use clean, sharp pruners to snip the entire flower stalk at its base, just above the first set of leaves. Cutting too close to the foliage can damage the plant, while leaving a stub encourages disease. You'll know you're doing it right when the cut is clean and the stalk falls away easily. For large clumps, I tackle one stalk at a time to avoid overwhelming myself.
✂️ Step 2: Trim Leggy or Damaged Leaves
While you're at it, check the leaves for any that are yellowed, torn, or otherwise unhealthy. Hostas are tough, but they look best when their foliage is vibrant. I focus on leaves that are more than 30% damaged or discolored—these won’t recover and just drain energy from the plant. Use your pruners to cut these leaves at the base, where they meet the stem.
Don’t worry about perfect symmetry—hostas thrive on natural shape. If a leaf is only partially damaged, I leave it unless it’s severely affecting the plant’s appearance. After trimming, I always step back to admire the fresh, healthy look. This is the moment you’ll see the real transformation in your garden.
✂️ Step 3: Clean Up Debris and Prevent Disease
After deadheading, gather all the spent blooms and trimmed leaves into a pile. Hostas can be prone to fungal issues, so removing debris promptly is key. I use a small rake or my hands to collect everything, then either compost it (if it’s disease-free) or dispose of it in the trash. Never leave cuttings on the soil surface—they can harbor pests or fungi that will attack your plants.
I also take a moment to check the soil around the hostas for any lingering debris or mulch that might have accumulated. A light raking with a leaf rake ensures the base of the plant stays clean and air can circulate freely. This step might feel tedious, but it’s what keeps your hostas looking their best for years.
🌿 Step 4: Encourage New Growth with Optional Fertilizer
Once the deadheading is done, I like to give my hostas a little boost. If you’re using fertilizer, now’s the time to apply a balanced, slow-release formula like 10-10-10. Sprinkle it lightly around the base of the plant, keeping it at least 6 inches away from the crown. Water it in gently to help it dissolve into the soil. This ensures the nutrients reach the roots without burning the foliage.
If you’re not using fertilizer, a good soaking with water is enough to help the plant recover. I always water deeply after deadheading to encourage new growth. You’ll see the difference in just a few weeks—fresh, vibrant leaves will start to emerge, and the plant will look fuller and more energetic. This is the payoff for all the effort!
⏰ Step 5: Schedule Regular Maintenance
Deadheading isn’t a one-time job—it’s an ongoing process. For hostas, I recommend checking them every 2-3 weeks during the growing season (spring through fall). This keeps the plant looking tidy and encourages continuous growth. I also make a note in my gardening journal to revisit them after heavy rains or storms, as wind or hail can damage leaves quickly.
In late fall, as the leaves start to yellow and die back, I cut them back to the ground. This isn’t deadheading in the traditional sense, but it keeps the garden neat and makes it easier to spot new growth in the spring. With this routine, your hostas will stay lush, healthy, and beautiful year after year. It’s amazing how a little regular care can make such a big difference!
Tips & tricks for perfect hosta plant maintenance
Here's what I've learned from years of deadheading hostas—these tricks will help your plants stay healthy and vibrant all season long.
Timing is Everything: The best time to deadhead hostas is when the blooms have completely wilted and turned brown, which usually happens a few weeks after flowering. This timing ensures the plant has already allocated energy to seed production, so you're not cutting off potential growth. I always check my hostas every 2-3 weeks during the growing season to catch spent blooms early before they become a burden.
Tool Prep Matters: Before you start, make sure your pruners are clean and sharp. Dull blades can crush stems instead of making clean cuts, which can damage the plant and invite disease. I like to wipe down my pruners with rubbing alcohol between plants to prevent spreading any potential pathogens. This small step makes all the difference in keeping your hostas healthy.
The 30% Rule for Leaf Trimming: When checking leaves in Step 2, I focus on removing only those that are more than 30% damaged or discolored. Leaves with less damage can often recover, and removing too many healthy leaves can stress the plant. This rule helps me strike the perfect balance between tidiness and plant health, ensuring my hostas stay lush without unnecessary stress.
Fertilizer Timing Tip: If you choose to fertilize after deadheading (Step 4), I recommend applying it in the late afternoon when temperatures are cooler. This helps prevent fertilizer burn, which can occur when hot sun causes the fertilizer to concentrate too quickly. Always keep the fertilizer at least 6 inches away from the crown to protect the plant's delicate growing point.
Pro Tips for Deadheading Hosta Plants
- Here's what I've learned from years of deadheading hostas—these tricks will help your plants stay healthy and vibrant all season long.
- Timing is Everything: The best time to deadhead hostas is when the blooms have completely wilted and turned brown, which usually happens a few weeks after flowering.
- Tool Prep Matters: Before you start, make sure your pruners are clean and sharp.
Frequently asked questions
Got questions about deadheading hostas? You’re not alone! Here are some of the most common queries—plus straightforward answers to keep your hostas thriving all year.
When is the best time to deadhead hosta plants?
Deadhead hostas after they’ve finished blooming (usually late summer to early fall). For spent flower stalks, snip them at the base once they turn brown or flop over. If you’re dealing with damaged or yellowing foliage, remove it anytime during the growing season—just avoid cutting back healthy leaves until late fall or early spring.
Do I need special tools to deadhead hostas?
Nope! A clean pair of bypass pruners or sharp scissors will do the trick. For larger clumps or stubborn stalks, sterilized shears (dipped in rubbing alcohol) prevent disease spread. Skip the hedge clippers—hostas have delicate foliage, and you’ll want precision cuts, not jagged edges.
What if I skip deadheading? Will my hostas still grow?
Yes, but expect less vigor and more pests. Deadheading redirects energy from seed production back to foliage growth, keeping your hostas lush. Skipping it may lead to moldy stalks, slug magnets, or weaker new leaves. Think of it like tidying up—your hostas will thank you with bigger, healthier leaves next season!
Can I compost deadheaded hosta parts?
Healthy hosta foliage and flower stalks (free of disease or pests) make great compost. Just avoid adding any parts with black spots (fungus) or chewed leaves (slugs/snails)—these can spread problems in your compost pile. Shred the material first for faster decomposition.
What’s the difference between deadheading and cutting back hostas?
Deadheading = removing spent blooms or damaged leaves to encourage new growth. Cutting back = trimming entire leaves or stalks (usually in late fall or early spring) to prep for dormancy or control size. Pro tip: Never cut back healthy foliage mid-season—it stresses the plant!
Wrapping up and next steps
Deadheading hosta plants is your secret weapon for keeping your garden thriving year-round! By removing spent blooms and yellowing leaves, you encourage healthier foliage, deter pests, and even boost next season’s growth.
It’s simple, rewarding, and a small task that makes a big difference—so grab those shears and get pruning!
Ready to take your hosta care to the next level? Plan your next garden session—whether it’s dividing overgrown clumps or adding mulch for extra protection. Your lush, vibrant hostas will thank you! 🌿✨