
Companion Plants
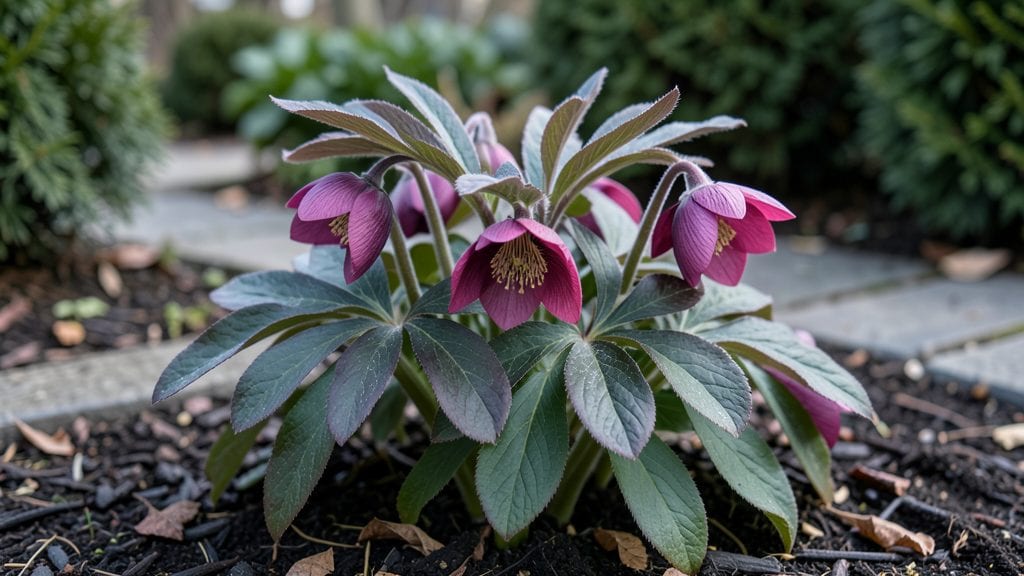
The stunning helleborus orientalis plants bloom when most gardens sleep under frost, offering jewel-toned flowers to winter landscapes. I’ve grown mine through three winters now, and they’ve never failed to deliver that first burst of color in late January.
The key starts with partial shade and rich, well-draining soil. They hate soggy roots but love moisture—think of them as the divas of the shade garden. A spot with morning sun and afternoon shade works best, and amending your soil with compost before planting sets them up for success.
Most gardeners overlook their watering needs, but keeping the soil consistently moist (not soggy) during their first growing season is critical.
By spring, you’ll see glossy, leathery foliage and those iconic nodding blooms in shades of white, pink, or deep purple. These flowers aren’t just pretty—they’re a magnet for early pollinators like bees, who adore their nectar.
The plants multiply slowly over time, so you won’t need to divide them for years, but when you do, early spring is the perfect time.
Here’s the trick I learned the hard way: avoid fertilizing in fall, as it encourages tender new growth that freezes. Instead, feed lightly in early spring with a balanced fertilizer.
With the right spot and a little attention, these plants become the backbone of your winter garden—reliable, elegant, and impossible to kill once established.
📚 In This Guide
- What you need
- Instructions
- Tips and common mistakes
- Wrapping up and next steps
What you need
- ● Helleborus orientalis plants: 3–5 mature plants (or seeds if starting from scratch). Choose varieties like 'Winter Jewels' or 'Pink Frost' for vibrant blooms.
- ● Well-draining potting mix or garden soil: 5–10 gallons (for containers) or amended garden beds with compost (for in-ground planting). Aim for a pH of 6.0–7.5.
- ● Organic mulch: 2–3 inches of shredded bark, pine needles, or leaf mold to retain moisture and regulate soil temperature.
- ● Slow-release fertilizer: 1–2 cups of 10-10-10 or 5-10-10 (low-phosphorus) per 10 sq. ft. of planting area.
- ● Garden tools: Trowel or transplant spade
- ● Garden fork (for loosening soil)
- ● Pruners (sterilized)
- ● Watering can or hose with a gentle spray nozzle
- ● Container gardeners: 12–15 inch pots with drainage holes (terracotta or fabric pots preferred).
- ● Support structures: Small stakes or pebbles to weigh down floppy stems in windy areas.
- ● Pollinator-friendly companions: Pair with Lungwort (Pulmonaria) or Crocus for a winter-long buffet.
- ● Soil amendments: Perlite or sand (1 part per 3 parts soil) to improve drainage in heavy clay.
- ● Seasonal care: Liquid seaweed fertilizer (monthly during growing season) for extra vigor.
Instructions for planting and caring for Helleborus orientalis
Here's how to establish these stunning winter bloomers with minimal fuss.
Select the Perfect Planting Site
Helleborus orientalis thrives in partial shade, where it receives 3-4 hours of morning sun and afternoon shade. Avoid deep shade—plants need some light to bloom, but too much afternoon sun can scorch the leaves. I always choose a spot with well-draining soil and slightly acidic to neutral pH (6.0-7.0). Test your soil first if possible, as heavy clay or alkaline soil will stunt growth.
This plant is hardy in USDA Zones 3-9, making it versatile for most climates. If you're in a hotter zone, prioritize afternoon shade to prevent leaf burn. Mulch heavily around the base with 2-3 inches of organic mulch (like shredded bark) to protect roots from temperature swings and retain moisture.
Prepare the Soil and Plant Correctly
Amend your native soil with 3-4 inches of compost mixed into the top 6-8 inches of soil. Helleborus orientalis dislikes soggy roots, so if your soil is heavy clay, blend in 20% perlite or coarse sand to improve drainage. Dig a hole twice as wide as the root ball but only as deep as the top of the root ball—planting too deep can suffocate the crown.
Gently loosen the roots if they're circling in the pot, then place the plant in the hole so the top of the root ball sits just below soil level. Backfill with the amended soil, pressing lightly to remove air pockets. Water deeply right after planting to settle the soil and encourage root contact. Avoid disturbing the plant again for 4-6 weeks to let roots establish.
Water and Fertilize for Strong Growth
Water once a week during the first growing season, providing 1-1.5 inches of water each time. Check soil moisture by sticking your finger 2 inches deep—water when it feels dry. Overwatering is the biggest mistake beginners make; these plants prefer consistently moist but never soggy soil. Once established (after 2-3 years), they become quite drought-tolerant.
Feed lightly in early spring with a balanced, slow-release fertilizer (10-10-10) applied at half the recommended rate. Too much fertilizer encourages leafy growth at the expense of flowers. I skip fertilizing in the fall to allow the plant to harden off for winter. If your soil is rich, you might not need to fertilize at all—just monitor the plant’s health.
Prune and Maintain for Long-Term Beauty
Remove spent flower stalks after they fade but before seed pods form, as this redirects energy to next year’s blooms. Cut back to the base with clean, sharp shears. Avoid pruning leaves unless they’re yellowed or diseased—healthy foliage photosynthesizes all year, even in winter, to fuel next season’s flowers. I also trim any leggy stems in early spring to encourage bushier growth.
Divide mature clumps every 3-5 years in early spring or fall if the center becomes bare. Dig up the plant, separate the sections with a sharp knife, and replant immediately. Each division should have 3-5 healthy buds at the base. This rejuvenates the plant and gives you free extra specimens for friends or other spots in your garden.
Protect and Enjoy Year-Round Interest
Helleborus orientalis is evergreen in mild climates and semi-evergreen in colder zones, providing winter interest when most gardens are dormant. In areas with hard freezes, the leaves may yellow but will regrow in spring. Mulch heavily in late fall with 3-4 inches of shredded leaves or bark to insulate roots and protect against temperature fluctuations.
These plants are low-maintenance once established, but they reward patience with stunning blooms from late winter to early spring. Watch for early pollinators like bees and butterflies—their nectar-rich flowers are a lifeline in late winter. If slugs become an issue (they love young leaves), apply diatomaceous earth around the base or use copper barriers for organic control.
Tips & tricks for perfect Helleborus orientalis planting
These simple but powerful tips will help you establish your Helleborus orientalis for years of winter blooms and pollinator support.
Site Selection Savvy: When evaluating morning sun exposure in Step 1, focus on the eastern or southeastern exposure of your garden. The gentle morning sunlight provides just enough energy for blooming without the intensity of afternoon rays. I've found that plants in these spots produce larger, more vibrant flowers. Also, avoid planting near large trees that will eventually cast deep shade—helleborus needs that balance of light to thrive.
Soil Prep Secrets: In Step 2, don't just add compost—think about texture. For heavy clay soils, I recommend mixing in 20% perlite or coarse sand by volume, not by weight. This creates pockets that prevent waterlogging while still maintaining moisture. You can test your drainage by digging a hole, filling it with water, and checking if it drains within 30 minutes. If not, amend further.
Watering Wisdom: The once-weekly watering in Step 3 requires consistency. I've learned the hard way that skipping watering when it rains can lead to uneven moisture. Use a rain gauge or tuna can to measure your weekly 1-1.5 inches of water accurately. Early morning watering prevents fungal issues, and watering at the base (not leaves) keeps foliage dry and healthy.
Division Timing: When dividing in Step 4, early spring is ideal because the plant's energy is focused on new growth rather than flowering. I've found that divisions made in fall sometimes struggle to establish before winter. If you must divide in fall, choose a mild fall day and give the new plants extra mulch protection for winter. Each division should have at least 3-5 buds to ensure robust regrowth.
Pro Tips for Helleborus Orientalis Plants
- These simple but powerful tips will help you establish your Helleborus orientalis for years of winter blooms and pollinator support.
- Site Selection Savvy: When evaluating morning sun exposure in Step 1, focus on the eastern or southeastern exposure of your garden.
- Soil Prep Secrets: In Step 2, don't just add compost—think about texture.
Frequently asked questions
Are Helleborus orientalis plants easy to grow for beginners?
Helleborus orientalis is a fantastic choice for beginners! These hardy perennials thrive in partial shade, tolerate poor soil, and bloom even in winter. Just plant them in well-draining soil, water moderately, and avoid over-fertilizing. With minimal care, they’ll reward you with months of striking flowers—no green thumb required!
How long does it take for Helleborus orientalis to bloom after planting?
Patience is key! Established plants may bloom within 1–2 years, but newly planted Helleborus often take 2–3 years to produce flowers. Focus on providing consistent moisture and shade during their first year to encourage strong root growth. Once settled, they’ll bloom reliably for decades!
Do Helleborus orientalis attract pollinators like bees and butterflies?
Their early-season blooms are a pollinator magnet, especially for bees and early butterflies. The flowers provide nectar when few other plants are in bloom, making them a must-have for pollinator gardens. Pair them with other winter-bloomers like Hamamelis (witch hazel) for a buzzing winter garden!
Can Helleborus orientalis survive harsh winters or extreme cold?
Yes! These plants are cold-hardy (USDA Zones 3–9) and thrive in winter. Their evergreen foliage and flowers often peek through snow. However, in Zone 3, mulch heavily (3–4 inches) with shredded leaves or straw to protect roots. Avoid late-season pruning, as new growth can be frost-sensitive.
What should I do if my Helleborus orientalis leaves turn yellow or spotty?
Yellowing or spotted leaves often signal overwatering, fungal issues (like leaf spot), or poor drainage. Improve airflow, water at the base (not overhead), and ensure soil drains well. Remove affected leaves promptly and apply a copper fungicide if needed. With better care, your plant should bounce back!
Are there any non-toxic alternatives to Helleborus if I have pets?
While Helleborus orientalis is mildly toxic to pets (can cause vomiting if ingested), safer alternatives include Helleborus niger (Christmas rose, less toxic) or pet-friendly winter bloomers like Galanthus (snowdrops) or Eranthis hyemalis (winter aconite). Always monitor pets near gardens!
Wrapping up and next steps
Helleborus orientalis isn’t just a winter beauty—it’s a pollinator powerhouse that brings life to your garden when others sleep. With its hardy nature, striking blooms, and ease of care, it’s the perfect addition for gardeners who love low-maintenance elegance and eco-friendly charm. Whether you’re a seasoned green thumb or a curious beginner, this plant offers years of joy with minimal effort.
Ready to transform your garden? Start small—plant a few Helleborus orientalis this fall or winter, and watch as they thrive and attract bees, butterflies, and hummingbirds. Grab some cuttings or seeds today and let nature do the rest! 🌸