
Picking
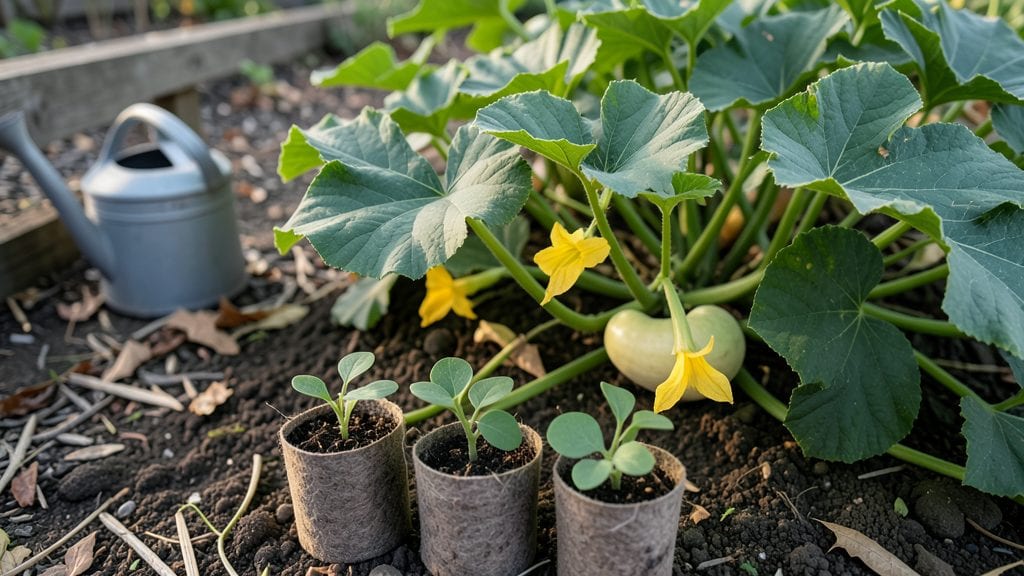
Planting crookneck squash in your sunny patch means summer after summer of those sweet, tender fruits that disappear from grocery shelves by July.
I learned the hard way that timing and soil prep make all the difference—my first crop bolted because I planted too early, and the second year's vines flopped from poor soil. The right spot and a few simple steps turn this fussy summer squash into a garden superstar.
You’ll need a full-sun location (at least 6-8 hours of direct light daily), well-draining soil mixed with compost, and plenty of space—3-4 feet between plants or 5-6 feet between rows.
Crooknecks thrive in warm soil, so wait until after the last frost when nighttime temperatures stay above 55°F. A 1-inch-deep trench for seeds (or transplants) gives them the stable start they crave, and mulch keeps roots cool and moist once they sprout.
By midsummer, you’ll be harvesting 3-4 inch fruits—still tender and sweet—every few days. The vines produce prolifically if you keep them watered (but not soggy) and fertilized lightly with nitrogen every 3-4 weeks.
Prune any yellowing leaves early to redirect energy to fruit production, and watch those curvy necks develop their signature shape. The first harvest feels like winning the lottery in your own backyard.
This method works in zones 3-10, though southern gardeners should plant in early spring for fall harvests. Containers work too—just use 15-gallon pots for single plants. The key is patience: crooknecks take 50-60 days to mature, but once they start producing, they don’t stop until frost.
Here’s how to keep them thriving all season.
📚 In This Guide
- What you need
- Instructions
- Tips and common mistakes
- Wrapping up and next steps
What you need
- ● Crookneck squash seeds – Opt for heirloom or hybrid varieties like Early Prolific Straightneck or Golden Delicious. Buy 5–10 seeds per plant (or 1–2 plants per 3–4 ft of row space).
- ● Well-draining soil – Test for pH 6.0–7.0. Amend with compost or aged manure if needed (1–2 inches mixed into the top 6–12 inches of soil).
- ● Fertilizer – A balanced, 10-10-10 or 5-10-10 formula (or compost tea for organic growers). Apply 2–3 tbsp per plant at planting and mid-season.
- ● Watering can or hose with a gentle nozzle – Aim for 1–2 inches of water per week, keeping soil moist but not soggy.
- ○ Garden twine or stakes (optional but helpful) – Use 3–4 ft stakes or trellis netting if your variety vines heavily.
- ● Gloves and pruners – For handling vines and removing pests/diseased leaves.
- ● Mulch (straw, grass clippings, or black plastic) – Spread 2–3 inches around plants to retain moisture and suppress weeds.
- ● Row covers or shade cloth – Protect seedlings from pests or harsh sun (use 30–50% shade if in hot climates).
- ● Drip irrigation system – Automates watering and reduces disease risk.
- ● Companion plants – Try bush beans, corn, or nasturtiums to deter pests.
- ● Harvest basket or knife – A sharp knife ensures clean cuts when harvesting.
Step-by-Step instructions for planting crookneck squash
Here’s how I plant these vining beauties for maximum yield—no guesswork, just proven techniques.
Choose the Perfect Planting Site
Crookneck squash thrives in full sun—select a spot that receives at least 6-8 hours of direct sunlight daily. These plants sprawl, so ensure the area has room to grow, ideally 6-8 feet in diameter per plant or 3-4 feet apart in rows. I always avoid low-lying spots where cold air collects, as squash roots dislike chilling.
Test the soil by squeezing a handful—it should crumble easily when dry but hold moisture without sticking. If your soil is heavy clay, mix in 2-3 inches of compost to improve drainage and fertility. Crookneck squash prefers slightly acidic to neutral soil (pH 6.0-7.0), so a soil test kit is worth the investment if your garden history is unknown.
Prepare the Soil and Warm the Ground
Two weeks before planting, till the soil to a depth of 12 inches, breaking up any compacted layers. Work in 2-3 inches of well-aged compost or a balanced organic fertilizer (10-10-10) to provide nutrients without burning tender roots. I also spread a thin layer of black plastic mulch over the bed to warm the soil—crookneck squash germinates best in 70-90°F soil, and this trick speeds up sprouting.
Remove the mulch just before planting and create mounds or hills of soil, about 6 inches high and 12 inches wide. These raised beds improve drainage and help prevent rot. Space mounds 3-4 feet apart to give vines room to spread. If you’re planting in rows, till a 12-inch deep furrow and add compost directly into the bottom before backfilling.
Plant Seeds at the Right Depth and Spacing
Sow 2-3 seeds per mound, placing them 1 inch deep and 2 inches apart. Planting multiple seeds ensures at least one strong starter, as squash seeds can be finicky. Press the seeds gently into the soil—don’t bury them too deeply, or they’ll struggle to emerge. Cover lightly with soil and water gently but thoroughly to settle the seeds without displacing them.
Thin seedlings to one per mound when they reach 2-3 inches tall, using scissors to snip unwanted plants at soil level. Avoid pulling, as it disturbs the roots of the remaining seedlings. I mark each mound with a small stake to avoid accidentally disturbing the plants later. Crookneck squash needs consistent moisture, so mulch around the base with 2-3 inches of straw to retain water and suppress weeds.
Provide Support and Monitor Growth
As vines mature, they’ll need support to prevent sprawling. Install trellises, cages, or sturdy stakes near the planting site—crookneck squash vines can grow 10-15 feet long, so secure supports 6 feet tall at minimum. Gently weave vines onto the trellis as they grow, or let them sprawl if space allows, but keep them off the ground to reduce disease risk.
Watch for first true leaves, which appear 7-14 days after planting. This is your cue to start fertilizing lightly with a low-nitrogen, high-phosphorus feed (like 5-10-10) to encourage flowering. Water at the base of the plant, avoiding the leaves to prevent fungal issues. You’ll know moisture is right when the soil feels damp 2 inches down but not soggy.
Protect and Harvest for Maximum Yield
When male flowers appear (they have a small stem and no bulb at the base), hand-pollinate by transferring pollen from the male anthers to the female flowers (which have a tiny squash forming at the base). Do this in the morning for best results. Squash are ready to harvest when they’re 6-8 inches long, with a smooth, firm skin and a bright yellow or cream color. Twist gently to detach from the vine—don’t cut, as this can invite rot.
Harvest every 2-3 days during peak season to encourage more production. Store squash in a cool, dry place (50-55°F) for up to 2 weeks. If vines yellow or produce small, deformed squash, it’s often a sign of poor pollination or inconsistent watering. Adjust your routine accordingly—crookneck squash rewards attention with sweet, tender fruit when cared for properly.
Tips & tricks for perfect crookneck squash planting
These garden-tested strategies will help you avoid common pitfalls and maximize your harvest of sweet, tender crookneck squash.
Soil Temperature Secret: The 70-90°F soil temperature range specified in Step 2 is critical for germination. I've found that using a soil thermometer for a few days before planting helps ensure optimal conditions. If your soil feels cooler than 70°F, consider using a cold frame or planting slightly later in the season. Cold soil slows germination and can lead to uneven sprouting, which sets your entire crop back.
Thinning Technique: When thinning seedlings to one per mound in Step 3, I recommend doing this on a cloudy day or in the late afternoon to reduce stress on the plants. The 2-3 inch height guideline is perfect—any earlier and you risk damaging the remaining seedling's roots, while waiting longer means competing plants will shade each other. Use clean, sharp scissors and make a clean cut at soil level to prevent disease entry points.
Support System Strategy: For the 6-foot tall supports mentioned in Step 4, I've had great success with tomato cages modified by cutting off the top third and reinforcing with wooden stakes. This creates a sturdy frame that won't collapse under the weight of heavy squash vines. Install supports as soon as you see the first true leaves appearing—this gives vines something to grab onto early in their growth.
Harvest Timing: The 6-8 inch size guideline in Step 5 is ideal for peak flavor, but I've learned to harvest slightly smaller (around 5 inches) if you're dealing with cooler temperatures. Smaller squash develop faster and are less likely to become tough or seedy. Always harvest in the morning when the skin is firmest, and use a sharp knife to make a clean cut if twisting proves difficult with larger specimens.
Pro Tips for Crookneck Squash Planting
- These garden-tested strategies will help you avoid common pitfalls and maximize your harvest of sweet, tender crookneck squash.
- Soil Temperature Secret: The 70-90°F soil temperature range specified in Step 2 is critical for germination.
- Thinning Technique: When thinning seedlings to one per mound in Step 3, I recommend doing this on a cloudy day or in the late afternoon to reduce stress on the plants.
Frequently asked questions
Got questions about growing crookneck squash? You’re not alone—this versatile veggie has a few quirks! Here are answers to the most common queries to help you plant with confidence.
When is the best time to plant crookneck squash?
Plant crookneck squash after the last frost when soil temperatures reach at least 60°F (15°C). In warm climates, start seeds in late spring (April–May); in cooler zones, wait until June. For a head start, sow seeds indoors 2–3 weeks before transplanting outdoors.
How long does it take for crookneck squash to mature?
Most varieties take 45–55 days to harvest after transplanting. Look for squash that’s 6–10 inches long, firm to the touch, and a deep yellow or green hue. Pro tip: Harvest in the morning when flavors are peak!
Can I grow crookneck squash in containers?
Yes! Choose a 5-gallon container with drainage holes and plant 1–2 seeds per pot. Use a lightweight potting mix and place containers in full sun. Just ensure vines have room to sprawl—trellises work well for vertical growth.
What pests should I watch for, and how do I prevent them?
Common pests include squash bugs, cucumber beetles, and aphids. Prevent them with:
- Row covers (early season protection)
- Neem oil (spray foliage weekly)
- Handpick eggs (check under leaves)
- Diatomaceous earth (for beetles)
What if my squash flowers but doesn’t produce fruit?
Fruitless blooms often mean pollination issues. Hand-pollinate by gently brushing flowers with a small brush or toothbrush. Other fixes:
- Ensure consistent warmth (below 60°F or above 90°F can stunt pollinators).
- Plant bee-friendly flowers nearby to attract pollinators.
- Check for herbicides (some harm bees).
Can I save seeds from crookneck squash?
Yes! Let a few squash fully mature and overripe on the vine (they’ll turn soft and mushy). Scoop out seeds, rinse, and dry them on a paper towel for 3–5 days. Store in a cool, dark place for up to 3 years. Note: Hybrid varieties may not grow true.
Wrapping up and next steps
Growing crookneck squash is a rewarding journey that turns your sunny patch into a treasure trove of golden harvests! With the right soil, spacing, and care, you’ll soon be savoring homegrown squash straight from the vine. 🌱✨
Now that you’re armed with planting tips and troubleshooting know-how, it’s time to roll up your sleeves and get growing. Start by marking your garden beds, then watch your efforts bloom into a bountiful harvest—perfect for roasting, grilling, or sharing with neighbors. Happy planting!