
Pruning
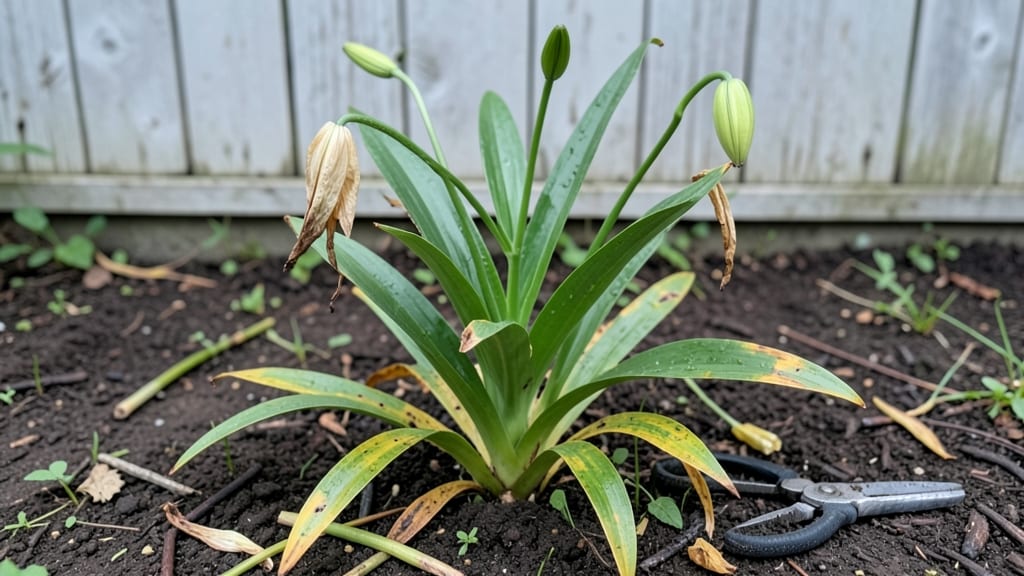
Trimming lily plants isn't just about tidying up—it’s the secret to stronger stems and bigger blooms next season. I’ve learned the hard way that skipping this step means smaller flowers and weaker growth, but doing it right transforms your lilies into showstoppers.
The key is timing: cut back after blooms fade in summer, but never too late in the season, or you’ll risk stunting next year’s flowers.
You’ll need sharp pruners, gloves, and a clear day to work—damp foliage tears instead of cutting cleanly. For Asiatic and Oriental lilies, trim stems down to the base once they’ve finished blooming, but leave daylilies until early fall.
The goal is to remove spent blooms and up to a third of the foliage without overdoing it, so the plant can store energy for next year’s growth.
What you’ll end up with is a garden full of vibrant blooms that stand taller and last longer. The right cuts encourage the plant to focus energy on bulb strength, not just more flowers.
Plus, your lilies will look neater and stay healthier, resisting pests and diseases better than neglected plants.
This method works for all lily types, whether you’re dealing with dramatic Oriental hybrids or hardy daylilies. The only mistake to avoid? Trimming too early or too late—both can weaken the plant. Let’s get those blooms prepped for their next big show!
📚 In This Guide
- What you need
- Instructions
- Tips and common mistakes
- Wrapping up and next steps
What you need
- ● Pruning shears or secateurs – Sharp, bypass-style shears (4-6" blade) for clean cuts without crushing stems.
- ● Garden gloves – Durable, cut-resistant gloves (size medium or large) to protect your hands from thorns and dirt.
- ● Disinfectant (rubbing alcohol or bleach solution) – 70% isopropyl alcohol or 1 part bleach to 9 parts water to sterilize tools between cuts.
- ● Compost bin or bag – For disposing of trimmed foliage (avoid diseased plants—see tips below!).
- ● Watering can or hose – To hydrate plants before and after trimming.
- ○ Stake or support (optional but helpful) – Bamboo stakes or plant ties if your lilies need extra support post-pruning.
- ● Hand pruners (for smaller cuts) – 3-4" blade for delicate trimming near the base.
- ● Mulch (straw or shredded bark) – To protect the soil and retain moisture after trimming.
- ● Plant food (balanced fertilizer) – 10-10-10 or 20-20-20 NPK ratio to give lilies a post-pruning boost.
- ● Knee pad or stool – For comfort if you’re working in a large garden bed.
Instructions for trimming lily plants
Here’s how to keep your lilies healthy and blooming their best with simple, precise cuts.
Identify and Remove Dead or Damaged Foliage
Start by inspecting each stem for brown, yellow, or wilted leaves—these are signs of decay or disease. Use sharp, clean pruners to cut these away at the base, just above a healthy leaf node. This prevents the plant from wasting energy on dead material and encourages new growth. If you spot any black spots or mold, sterilize your pruners with rubbing alcohol between cuts to avoid spreading issues.
Don’t rush this step. Take your time to examine every leaf and stem, even if it looks mostly green. Lilies are resilient, but removing just a few problematic leaves can make a noticeable difference in how vigorous the plant stays. Once you’ve cleared out the dead growth, you’ll see fresh, vibrant stems emerging more clearly.
Trim Spent Blooms and Seed Pods
After lilies finish flowering, the blooms will wilt and eventually form seed pods. To redirect the plant’s energy toward next year’s blooms instead of seed production, snip off the spent flower stalks just above the first set of healthy leaves. Use clean pruners and make the cut at a slight angle to prevent water from pooling on the stem, which can cause rot.
Here’s the thing—if you leave those seed pods, your lilies will put all their effort into making seeds, leaving little energy for strong stems and bigger blooms next season. I always trim them right after the petals drop, usually in late summer. You’ll notice the plant looks tidier, and within weeks, new shoots will start forming at the base.
Cut Back Foliage After Blooming Season
Once the foliage turns completely yellow and begins to collapse—usually in late fall—it’s time to trim it back. Cut the stems down to about 2 inches above the soil line, but leave any new shoots or basal growth untouched. This allows the plant to store energy in its bulbs for next year’s growth while keeping the garden looking neat.
Don’t worry if you miss the exact timing. Even if you trim a little late, as long as the leaves have fully yellowed, the plant won’t suffer. The key is to avoid cutting back green foliage, as lilies need those leaves to photosynthesize and build up nutrients for future blooms. If you’re unsure, wait until the stems are completely limp and brown before cutting.
Prune Overcrowded or Weak Stems
If your lily patch has become overcrowded, use this time to thin out weak or competing stems. Look for stems that are thin, pale, or growing at odd angles—they’re likely not contributing much to the plant’s strength. Cut these at the base with clean pruners, leaving only the healthiest 3-5 stems per bulb if the clump is dense.
This step is all about giving your remaining stems room to thrive. Overcrowding leads to smaller blooms and weaker growth, so don’t hesitate to remove extra stems. After thinning, water the area deeply to help the remaining plants recover. You’ll see a noticeable difference in stem thickness and bloom size the following season.
Sterilize Tools and Monitor for New Growth
After trimming, wipe down your pruners with rubbing alcohol to prevent the spread of disease. Store them in a dry place until next season. Keep an eye on the trimmed areas for any signs of new shoots emerging from the base—this is a good sign that the plant is healthy and storing energy for next year.
Real talk: If you see mold or unusual spots after trimming, act fast. Remove the affected foliage immediately and treat the area with a fungicide if needed. With proper care, your lilies will reward you with stronger stems and bigger, more vibrant blooms year after year. Just a little precision now saves a lot of trouble later.
Tips & tricks for perfect lily plant trimming
A few simple tricks will help you trim your lilies like a pro, ensuring they stay healthy and produce stunning blooms year after year.
Precision Cutting: When trimming in Step 1, always cut just above a healthy leaf node—this is where new growth emerges. I learned this the hard way after accidentally cutting too close to the base, which left my lilies looking bare and stunted. Use clean pruners and make cuts at a slight angle to prevent water from pooling and causing rot.
Seasonal Timing: Late summer is the perfect time to trim spent blooms and seed pods (Step 2), as this redirects the plant’s energy toward next year’s growth. If you miss this window, don’t worry—just wait until the foliage turns completely yellow in late fall before cutting back (Step 3). The key is to avoid trimming green leaves, as they’re essential for photosynthesis and nutrient storage.
Thinning for Strength: In Step 4, focus on removing weak or overcrowded stems to give your lilies room to thrive. I always aim to leave 3-5 healthy stems per bulb, as this prevents competition for nutrients and results in stronger, more vibrant blooms. After thinning, give the area a deep watering to help the remaining plants recover and establish themselves.
Tool Care: Sterilizing your pruners between cuts (Step 1 and Step 5) is non-negotiable if you’re dealing with diseased foliage. I keep a small bottle of rubbing alcohol handy and wipe down my tools after every few cuts. This simple step prevents the spread of mold and bacteria, keeping your entire lily patch healthy and disease-free.
Pro Tips for Trimming Lily Plants
- A few simple tricks will help you trim your lilies like a pro, ensuring they stay healthy and produce stunning blooms year after year.
- Precision Cutting: When trimming in Step 1, always cut just above a healthy leaf node—this is where new growth emerges.
- Seasonal Timing: Late summer is the perfect time to trim spent blooms and seed pods (Step 2), as this redirects the plant’s energy toward next year’s growth.
Frequently asked questions
Got questions about trimming lily plants?
You’re not alone! Here are answers to the most common concerns—from timing to tools—to help you prune like a pro and keep your lilies thriving.
When is the best time to trim lily plants?
Trim lilies after they’ve finished blooming (late summer/early fall) to redirect energy to next year’s growth. Avoid cutting back in spring—new shoots need those leaves for photosynthesis! For deadheading (removing spent blooms), do it immediately to encourage reblooming varieties.
How far down should I cut back lily foliage?
Leave 1/3 of the foliage intact after blooming to ensure the bulb stores enough energy. Cut back to ground level only if the leaves turn brown/yellow (a sign of dormancy). Never remove all the leaves—this starves the bulb!
Can I trim lilies too early or too late?
Yes! Trimming too early (before blooms fade) stresses the plant, while waiting too late (after frost) can leave bulbs vulnerable to rot. For hardy lilies, aim for 6–8 weeks post-bloom. In colder climates, wait until after the first frost for cleanup.
What if my lilies look sad after trimming?
Yellowing leaves or floppy stems? You may have cut back too aggressively. If the soil stays moist, fungal issues could arise—ensure good airflow and avoid overhead watering. For reblooming types, skip heavy pruning until next year if growth seems weak.
Are there alternatives to cutting back lilies?
Yes! For Asiatic or Oriental lilies (non-rebloomers), you can tie up foliage with twine to keep it upright and reduce disease risk. For rebloomers, prune selectively: Remove only the oldest leaves (bottom 1/3) to balance growth. Mulch lightly after trimming to protect bulbs.
| Quick Fixes | When to Use |
|---|---|
| Deadhead spent blooms | Immediately after flowers fade |
| Leave 1/3 of foliage | After blooming (late summer) |
| Mulch with straw | After trimming in fall |
Wrapping up and next steps
Trimming your lily plants doesn’t have to be intimidating—it’s all about timing, technique, and a little TLC! 🌸 With the right tools and a clear plan, you’ll encourage healthier stems, more vibrant blooms, and a thriving garden.
Whether you’re a seasoned gardener or just starting out, every snip brings you closer to stunning results.
Ready to take the next step? Grab your pruners, mark your calendar, and get trimming! Your lilies will thank you with bold, beautiful blooms all season long. Happy gardening! 🌿✨