Pests
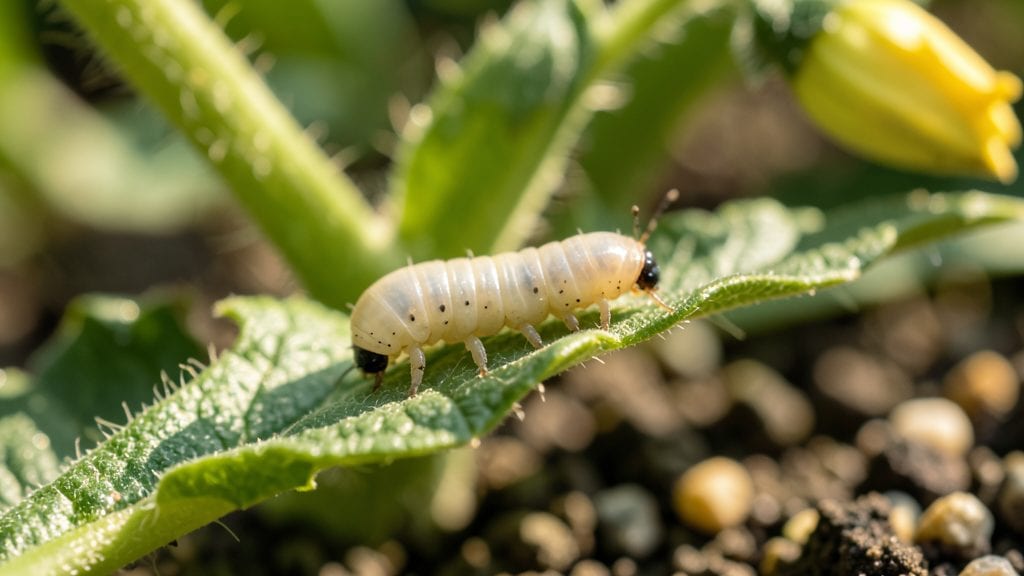
Tomato plant grubs can turn your thriving plants into skeleton leaves overnight. I’ve seen firsthand how these sneaky pests chew through stems and roots, leaving behind a trail of wilting plants that look like they’ve been starved—not just nibbled.
The worst part? Most store-bought fixes kill more than just the grubs, harming the very soil your tomatoes need to thrive.
These pests aren’t picky—they’ll target seedlings, established plants, and even your prized heirloom varieties. The damage starts small: notched leaves, then stems that snap like dry twigs when you brush past them. But here’s the good news: you can outsmart them without chemicals.
A few simple, organic methods—like handpicking at dawn or using row covers—work just as well as harsh sprays, and they keep your garden (and your tomatoes) healthy.
By the time you’re done, your plants will bounce back stronger, and you’ll have a foolproof system to stop future invasions. No more losing your entire harvest to hidden chewers lurking in the soil.
The key is acting fast when you spot the first signs—chewed stems, frass (that sawdust-like poop), or wilting that happens overnight. Every minute counts when grubs are feeding.
This works for backyard gardens, container-grown tomatoes, and even small urban plots. The same principles apply whether you’re dealing with cutworms, wireworms, or other larval pests. Let’s get those grubs out of your tomatoes for good—without sacrificing the roots that keep your plants standing tall.
Hidden Invaders Behind Your Tomato Plants
If your tomato plants are suddenly wilting, stunted, or covered in mysterious holes, the culprits might be lurking below the soil—or even inside the stems. These sneaky pests, often called tomato plant grubs, thrive in warm, moist conditions and can devastate your harvest if left unchecked.
But why do they target your tomatoes in the first place? Let’s break down the science behind their behavior and the conditions that make your garden their all-you-can-eat buffet.
Grubs—especially those from Colorado potato beetles, cutworms, or root maggots—are drawn to soil that mimics their natural habitat. Here’s what makes your garden irresistible to them:
- Rich, Organic Matter: Grubs love soil packed with decomposing leaves, compost, or manure because it provides both food and shelter. Nitrogen-rich soil (common in heavily fertilized gardens) accelerates their growth, as they feed on plant roots and organic debris. Actionable fix: Balance your soil with aged compost (not fresh) and avoid over-fertilizing before planting.
- Moisture Retention: Grubs thrive in consistently damp soil because it’s easier for them to burrow and stay hidden from predators like birds or beneficial nematodes. Actionable fix: Improve drainage with sand or grit, and avoid overwatering—especially in containers where roots can rot, creating a grub paradise.
- Compacted or Disturbed Soil: Loose, aerated soil is less inviting, but compacted or recently tilled beds signal easy access to roots. Actionable fix: Use a broadfork to loosen soil before planting, and mulch heavily to deter grubs from settling in.
Not all plants are equal when it comes to grub attraction. Tomatoes, potatoes, peppers, and other Solanaceae family members are top targets because their roots and foliage are a grub’s dream meal. Here’s why:
- Sap Composition: Tomato plants produce sugars and starches in their roots that grubs crave. Root maggots, for example, are specifically drawn to the scent of tomato root exudates. Actionable fix: Interplant tomatoes with grub-repelling companions like basil, marigolds, or onions to mask their scent.
- Young, Tender Roots: Seedlings and newly transplanted tomato plants have delicate roots that grubs can devour in days. Actionable fix: Harden off seedlings gradually and use row covers for the first 4–6 weeks to protect young plants.
- Stressed Plants: Grubs are opportunistic—they target weakened plants first. Overwatering, drought, or nutrient deficiencies make tomatoes more vulnerable. Actionable fix: Monitor soil moisture and fertilize with balanced, slow-release options (like worm castings) to keep plants resilient.
Grubs don’t just appear randomly—they follow a predictable life cycle tied to temperature and seasonal changes. Understanding their schedule helps you stay one step ahead:
| Grub Type | Peak Activity Period | Why It Matters |
|---|---|---|
| Colorado Potato Beetle Larvae | Late spring to early summer (when soil temps hit 60°F+) | Eggs hatch near tomato plants, and larvae burrow into soil to feed on roots. Actionable fix: Set up yellow sticky traps in early spring to catch adult beetles before they lay eggs. |
| Cutworms | Nighttime, especially after rain (spring to fall) | These nocturnal chewers sever stems at soil level. Actionable fix: Use collars made from cardboard around seedlings to block their access. |
| Root Maggots | Warm, humid conditions (late spring to summer) | Adult flies lay eggs near tomato stems, and maggots tunnel into roots. Actionable fix: Apply kaolin clay to stems to deter egg-laying flies. |
Pro Tip: 🌡️ Monitor soil temperature with a probe—grubs are less active below 55°F. Use mulch to regulate temperature and deter egg-laying adults.
Sometimes, well-meaning gardening practices invite grubs like an open buffet. Here’s how you might be accidentally helping them:
- Over-Tilling: Tilling aerates soil but also brings grubs to the surface, where they’re exposed to predators—or your shovel. Actionable fix: Use a broadfork to loosen soil without disturbing grubs deeply.
- Ignoring Crop Residue: Leaving old tomato plants (or potato vines) in the soil over winter provides food and shelter for overwintering grubs. Actionable fix: Remove all plant debris and solarize the soil in late summer to kill eggs.
- Using Synthetic Pesticides: Harsh chemicals can kill beneficial insects (like ground beetles) that naturally prey on grubs, creating a grub boom. Actionable fix: Opt for neem oil or beneficial nematodes to target grubs without harming ecosystems.
Practical ways to remove grubs safely
Now that you understand why grubs invade your tomato plants, it’s time to tackle them without harming your garden’s delicate ecosystem. The key is to act quickly but thoughtfully—using methods that are effective yet gentle on your plants and soil.
Below are targeted solutions for common grub-related issues, along with prevention tips to keep your tomato plants thriving.
If you spot grubs early, your hands (and a little patience) might be your best tool. This method is ideal for small infestations and works best in early morning or evening when grubs are near the surface.
- 👨🍳 Step 1: Water the Soil Lightly water the base of the plant to soften the soil. This makes it easier to spot grubs and reduces the risk of damaging roots while digging.
- 🔪 Step 2: Inspect the Roots Gently loosen the top 2–3 inches of soil around the plant’s base. Look for white, C-shaped larvae (grubs) or their tunnels. They may also leave behind chewed leaves or wilting stems.
- 🗑️ Step 3: Remove and Dispose Use tweezers or your fingers to pick out the grubs and drop them into a soapy water solution (1 tbsp dish soap per gallon of water) to kill them instantly. Avoid throwing them back into the garden—they’ll return!
- ✨ Pro Tip: If you’re squeamish about handling grubs, wear gloves and work in a shaded area to avoid attracting pests like ants (which love grubs too!).
For a long-term, organic solution, beneficial nematodes (Heterorhabditis bacteriophora or Steinernema carpocapsae) are microscopic worms that infect and kill grubs without harming plants or beneficial insects. This is perfect for moderate to large infestations.
- 📦 Step 1: Purchase Nematodes Buy them from a garden center or online (look for brands like Nemex or Grow More). They arrive in a powder or liquid form and must be applied when soil temps are between 55–85°F.
- 💦 Step 2: Apply at Night Mix the nematodes with cool, dechlorinated water (let tap water sit for 24 hours or use rainwater). Apply the solution directly to the soil around the plant’s base using a watering can with a fine rose attachment.
- 🌡️ Step 3: Water Lightly After Application Keep the soil moist (not soggy) for 7–10 days to help the nematodes move through the soil and find grubs. Repeat every 2–4 weeks if needed.
- 🎯 Pro Tip: Nematodes thrive in moist, well-drained soil. Avoid applying them if rain is forecasted within 24 hours—they’ll get washed away!
Grubs are less likely to target tomato plants when strong-smelling or toxic companions are nearby. This method is preventative but can also help deter new grubs from settling in.
- 🌿 Best Companion Plants:
- Marigolds (release a chemical that repels pests)
- Garlic & Onions (grubs dislike their strong odor)
- Basil (improves tomato flavor and deters pests)
- Nasturtiums (act as a trap crop, luring grubs away)
- 🌱 How to Use: Plant these around the perimeter of your tomato patch or interplant them with tomatoes. For extra protection, crush a few leaves occasionally to release more scent.
- 💡 Pro Tip: If you’re dealing with an existing infestation, companion planting alone won’t eliminate grubs—but it’s a great long-term strategy to keep them away.
The best defense is a strong offense. Here’s how to minimize grub damage before it begins:
- 🌡️ Monitor Soil Moisture Grubs love wet soil. Avoid overwatering, and ensure your garden has good drainage to discourage them from laying eggs.
- 🕳️ Use Row Covers Early If you’ve had grub issues before, cover young tomato seedlings with floating row covers until they’re established. This blocks adult beetles (which lay eggs) from reaching your plants.
- 🍎 Mulch Strategically While mulch helps retain moisture, avoid thick layers near the stem—grubs love hiding in dense mulch. Use straw or shredded leaves sparingly and keep them 2–3 inches away from the plant base.
- 🔍 Inspect Regularly Check your plants weekly for signs of grubs (wilting, chewed leaves, or frass—tiny black fecal pellets). Early detection = easier removal!
- 🌱 Rotate Crops If your garden is heavily infested, avoid planting tomatoes (or other nightshades like peppers) in the same spot next year. Grubs can linger in the soil for years!
Final Note: Grubs may seem like a nightmare, but with the right approach, you can restore your tomato plants without harsh chemicals. Combine hand-picking, nematodes, and companion planting for the best results—and always act fast to prevent further damage. Happy gardening! 🍅🌱
Frequently asked questions about tomato plant grubs
How do I know if my tomato plants have grubs and not just wilting from heat?
Look for chewed stems at soil level or tiny black frass (poop) near the base—these are telltale signs of grubs. Unlike heat stress, wilting from pests happens overnight and often affects only certain plants in a patch. Gently dig around the roots to spot white, C-shaped larvae.
Can I use coffee grounds to repel tomato grubs?
Yes! Coffee grounds deter grubs because they dislike the acidity and strong scent. Mix 1 cup of used grounds into the soil around plants or use as mulch. Reapply every 2-3 weeks for best results. Just avoid overdoing it—too much can make soil too acidic.
Will ducks or chickens eat tomato plant grubs?
Ducks and chickens love grubs and will happily dig them up. Let them forage in your garden for 1-2 hours daily during warm months. For best results, supervise them near young seedlings—they might peck at plants too. Just avoid letting them scratch up soil too deeply.
How long does it take for beneficial nematodes to work on grubs?
Nematodes typically take 7-14 days to find and kill grubs after application. You'll see results fastest in warm, moist soil (60-80°F). For severe infestations, reapply every 4 weeks during growing season. Always apply in the evening to protect them from UV light.
Are there any chemical-free sprays that work against tomato grubs?
Yes! A neem oil spray (1 tbsp per quart of water) disrupts grubs' feeding and growth. Spray directly on soil and foliage every 7-10 days. For stronger results, combine with kaolin clay (1 tbsp per gallon) to create a protective barrier. Both are safe for plants and beneficial insects.