Tools
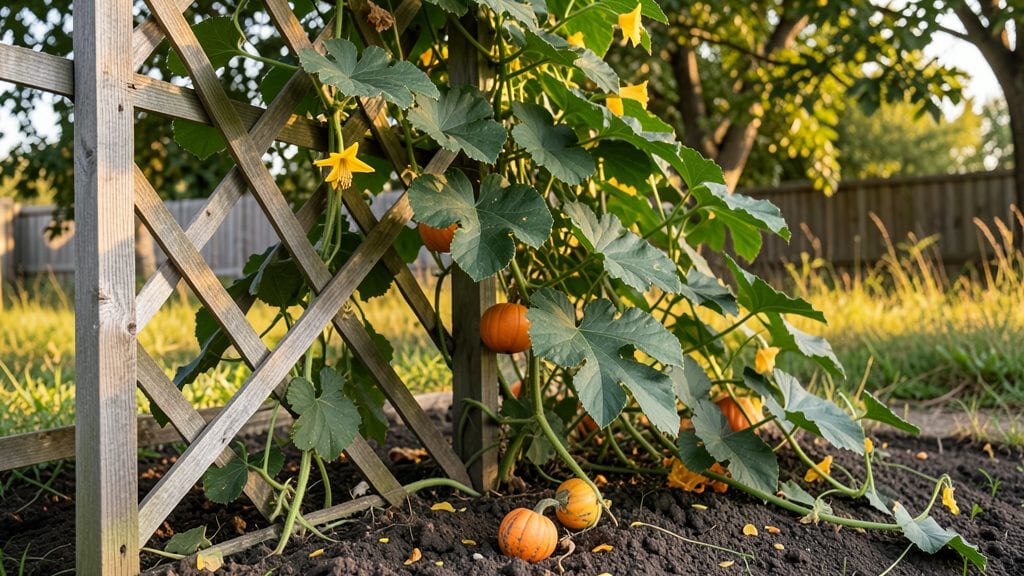
A pumpkin plant trellis turned my chaotic vines into vertical real estate that actually works—doubling my harvest in just one season. 🌱 same space. The secret isn't just saving room; it's how the vines grow stronger when supported, producing heavier, straighter fruit that's easier to handle.
You'll need a sturdy trellis (wooden lattice or heavy-duty netting works best) and some basic tools like pruning shears and garden twine. The setup takes about an hour, and once your vines start climbing, maintenance is minimal—just occasional pruning to encourage upward growth.
My favorite part? No more wrestling with giant, sprawling plants when harvest time comes.
By mid-summer, you'll see vines curling around the trellis like green ribbons, with pumpkins growing where you can actually reach them. The fruit stays cleaner, ripens more evenly, and those awkward handling days disappear. Plus, your garden beds stay open for other crops—no more sacrificing space to pumpkin chaos.
Works for both small gardens and urban spaces, and the same principles apply to winter squash too. Here's how to make it happen without the usual mess and frustration.
📚 In This Guide
- What you need
- Instructions
- Tips and common mistakes
- Wrapping up and next steps
What you need
- ● Trellis Structure: Wooden posts (4x4 or 6x6 inches, 8 feet tall) – 4-6 posts (depending on trellis size)
- ● T-posts or metal stakes (alternative to wooden posts) – 4-6 stakes
- ● Lumber (2x4 or 4x4 inches) – 6-10 pieces, 8 feet long (for horizontal slats or lattice)
- ● Galvanized screws or nails (2.5-3 inches) – 50-100 pieces
- ● Fasteners & Hardware: Heavy-duty zip ties or bungee cords – 10-20 pieces (for securing vines)
- ○ Post anchors or concrete (optional but recommended for stability)
- ● Tools: Drill or hammer
- ● Measuring tape
- ● Level (to ensure trellis is straight)
- ● Saw (hand saw or circular saw)
- ○ Staple gun (optional, for attaching lattice mesh)
- ● PVC pipes or metal lattice panels (pre-made trellis kits)
- ● Landscape fabric or weed barrier (to suppress weeds around the base)
- ● Pruning shears (for trimming vines as they grow)
- ● Pumpkin support slings or mesh bags (to cradle heavy fruits)
Step-by-step guide for building a pumpkin trellis system
Here's how to create a sturdy, space-saving trellis that supports pumpkins beautifully while protecting your harvest.
🪴 Step 1: Choose and Prepare Your Trellis Structure
For a 4-plant system, I recommend using two 8-foot tall T-posts spaced 6 feet apart. Drive the posts 18 inches deep into moist soil at each end to ensure stability. The deeper you plant them, the less they'll wobble when vines get heavy. Connect the tops with two 8-foot lengths of heavy-duty garden twine or nylon rope, tying them tightly in an "X" pattern to create a diamond shape.
Add two horizontal crossbars (use 4-foot lengths of sturdy PVC pipe or bamboo) at 3-foot and 5-foot heights to give vines multiple levels to climb. Secure them with zip ties or strong twine—you'll want this framework to last through the entire growing season. This multi-tiered design prevents fruit from dragging on the ground and reduces rot risk.
🌱 Step 2: Plant Pumpkin Seeds at the Base
Dig 4 planting holes, each 12 inches deep and 12 inches wide, spaced 3 feet apart along the trellis line. Place 1 pumpkin seed per hole at a depth of 1-2 inches, covering it with the pre-moistened potting mix. Water each hole until the soil is evenly damp but not soggy—you want the seeds to germinate without sitting in water.
Mulch around each plant with 2 inches of straw mulch to retain moisture and suppress weeds. This is critical because pumpkin vines spread aggressively, and you don’t want competing plants stealing nutrients. Keep the mulch 3 inches away from the stem to prevent rot. Within 7-10 days, you'll see sprouts—this is your cue to start training the vines.
☀️ Step 3: Train Vines Up the Trellis as They Grow
Once vines reach 12 inches long, gently guide the main stem toward the lowest crossbar (3 feet up) and secure it with soft plant ties or old fabric strips. Never use wire—it can cut into the tender vines. As the vine climbs, it will produce side shoots and leaves; let these grow naturally but prune any that trail toward the ground to encourage upward growth.
When the vine reaches the top of the trellis (8 feet), let it cascade down one side. This creates a natural canopy that shades the fruit and keeps them off the damp soil. You'll notice male flowers first—they have long stems and no fruit. Remove these to redirect energy to female flowers, which have tiny pumpkins at their base. This focus ensures your trellised pumpkins grow larger and healthier.
💧 Step 4: Water and Fertilize for Maximum Yield
Water the base of each plant deeply 2-3 times per week, ensuring the soil stays consistently moist but well-drained. Trellised pumpkins need more frequent watering than ground-grown ones because their roots can't spread as widely. Check moisture by sticking your finger 2 inches into the soil—if it's dry, water again. Avoid overhead watering once flowers appear to prevent mildew.
After the vines start climbing (4-6 weeks in), apply a balanced 10-10-10 fertilizer around the base, keeping it 6 inches away from the stem. Use 1 tablespoon per plant every 4 weeks to support fruit development. Stop fertilizing 2 weeks before harvest so the pumpkins sweeten properly. You'll know you're on track when vines produce 3-5 female flowers per plant—each one has the potential to become a trellis-worthy pumpkin.
✂️ Step 5: Prune and Harvest for Healthy Growth
When pumpkins form, prune all vines beyond the fruit to redirect the plant’s energy into growing larger, not more. Leave only one vine per fruit—this ensures the pumpkin gets maximum support from the trellis. Use clean, sharp pruning shears to cut vines 2 inches above the fruit, making the cut at a 45-degree angle to prevent water from pooling.
Harvest when the pumpkin’s stem is dry and papery, and it sounds hollow when tapped. Gently twist the pumpkin to separate it from the vine—never cut the stem, as this can cause rot. Cure harvested pumpkins in a warm, dry place (80-85°F) for 10 days to harden the rind. With a proper trellis, you’ll avoid ground rot and end up with 4 showstopping pumpkins that last through winter storage.
Tips & tricks for perfect pumpkin trellis planting
Here's what I learned after building trellises for years—and how to avoid the mistakes that cost me pumpkins.
Stability is Everything: Those 8-foot T-posts need to go 18 inches deep—I learned this the hard way when a storm toppled my first attempt. Use a post hole digger for clean, straight holes, and check for wobble before attaching the crossbars. If they feel unstable, add a third post in the center for extra support. The last thing you want is your trellis collapsing under heavy vines.
Crossbar Placement Matters: The 3-foot and 5-foot crossbars create the perfect climbing ladder for vines. I've found that adding a third crossbar at 7 feet helps when vines get heavy with fruit. Space them evenly so vines can weave naturally between levels without getting tangled. Think of it like a vine staircase—each step should be easily reachable for the plant.
Training Vines Like a Pro: When your vines hit 12 inches long, don't just tie them up—guide them gently. I use soft fabric strips because they're kinder than twine and won't cut into the tender stems. Here's my trick: loop the tie around the vine first, then around the crossbar, leaving room for growth. Check ties weekly—they'll need adjusting as vines thicken. And remember, male flowers are the plant's way of practicing, so remove them to save energy for the female flowers that produce fruit.
Harvesting Without the Heartbreak: That 10-day curing period at 80-85°F is non-negotiable for long-term storage. I cure my pumpkins on a screened porch where they get morning sun and afternoon shade. If your climate can't maintain that temperature, use a sunny windowsill with a space heater (safely positioned!) or even a warm garage. The goal is to let the rind harden completely—this is what makes trellised pumpkins last through winter.
Pro Tips for Pumpkin Plant Trellis
- Here's what I learned after building trellises for years—and how to avoid the mistakes that cost me pumpkins.
- Stability is Everything: Those 8-foot T-posts need to go 18 inches deep—I learned this the hard way when a storm toppled my first attempt.
- Crossbar Placement Matters: The 3-foot and 5-foot crossbars create the perfect climbing ladder for vines.
Frequently asked questions
Got questions about growing pumpkins vertically?
Here are answers to the most common ones—so you can trellis like a pro!
What’s the best time to start training pumpkins up a trellis?
Plant pumpkin seeds or seedlings after the last frost when soil is warm (70°F+). Start training vines up the trellis when they’re 3–4 feet long—usually 3–4 weeks after germination. Early support prevents strain on young stems.
Can I use any trellis for pumpkins, or do I need something special?
Pumpkins need durable, sturdy support since they can weigh 20+ lbs each! A wooden A-frame, cattle panel, or heavy-duty netting works best. Avoid flimsy materials—think "hurricane-proof" for heavy gourds.
How do I know if my pumpkin is too big for the trellis?
Watch for vines sagging or bending under weight—that’s your cue! If the pumpkin is over 10 lbs or the stem looks stretched, it’s time to harvest or prune to protect the trellis. Smaller varieties (like ‘Jack Be Little’) handle vertical growth better.
What should I do if my pumpkin vines are dying or wilting on the trellis?
Check for pests (squash bugs, powdery mildew) or poor circulation. Prune damaged leaves, improve airflow, and treat with neem oil if needed. If vines are overcrowded, thin them to 2–3 main runners per plant.
Are there pumpkin varieties that grow better on trellises?
Yes! Opt for bush or semi-bush types like ‘Sugar Pie,’ ‘Cinderella,’ or ‘Minnesota Golden’—they’re compact and trellis-friendly. Avoid giant varieties (e.g., ‘Atlantic Giant’) unless you’re prepping for a serious support system!
Wrapping up and next steps
Transforming your pumpkin patch with a trellis isn’t just clever—it’s a game-changer for space, yields, and even pest control! 🌱 By guiding vines upward, you’ll enjoy healthier plants, easier maintenance, and bigger, show-stopping pumpkins without sacrificing garden real estate.
Whether you’re a seasoned gardener or a curious beginner, this vertical approach makes growing pumpkins fun, efficient, and rewarding.
Ready to put your newfound knowledge into action? Start small—pick a sunny spot, gather your materials, and let those vines climb! For extra inspiration, explore creative trellis designs or share your progress with fellow gardeners. Happy growing—your future harvest (and Instagram-worthy pumpkins) will thank you! 🎃✨