
How To
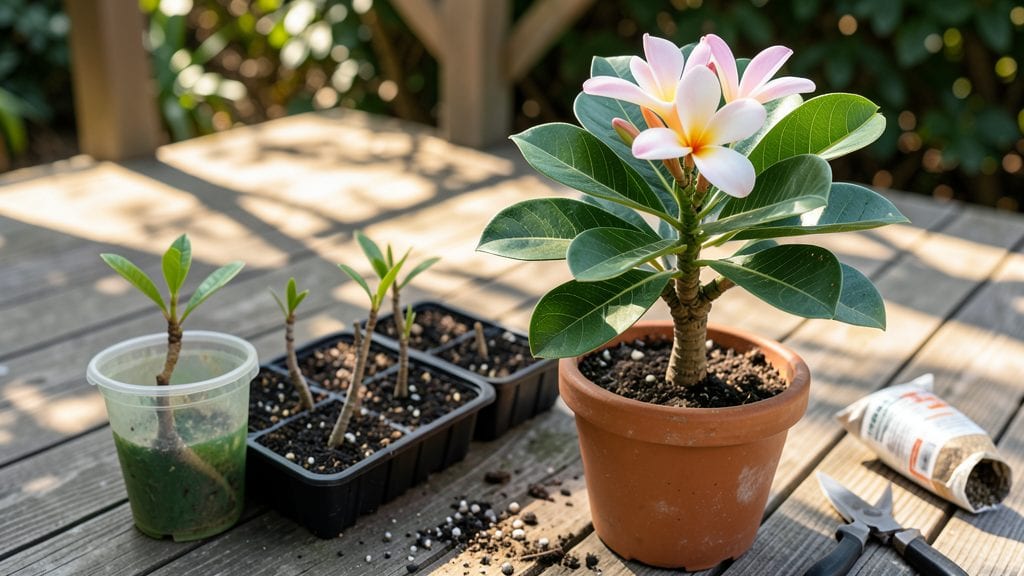
Planting frangipani cuttings is how I turned my summer patio into a fragrant paradise—those heavy, waxy blooms now greet me every morning. 🌿 The key isn’t just timing or luck; it’s getting the cut right, using the perfect rooting mix, and keeping humidity high enough to fool the plant into thinking it’s still in its tropical home.
Most people give up after two weeks, but with these secrets, you’ll see roots forming in as little as three weeks.
You’ll need just three supplies: sharp pruners, a well-draining mix of perlite and peat moss, and a clear plastic bag to trap humidity. The best time to take cuttings is right after flowering, when new growth is still tender but established.
I’ve rooted cuttings in 5-gallon pots on my balcony, and they’ve thrived—no greenhouse needed. The trick is patience and a steady hand when snipping that 4-6 inch stem just below a leaf node.
Once rooted, these cuttings will reward you with glossy, dark green leaves and—if you’re lucky—early blooms by next summer. The fragrance alone makes it worth the effort, but the real magic happens when you transplant them into the ground or larger pots.
Your neighbors will ask how you do it, and you’ll know the secret: humidity, light, and a little stubbornness.
This method works in zones 10-12, but container growers in cooler climates can overwinter cuttings indoors near a bright window. Just avoid overwatering—they’ll tell you when they’re thirsty by wilting slightly.
With these steps, you’ll be pinching off new growth in no time, and that’s when you’ll know you’ve cracked the code.
📚 In This Guide
- What you need
- Instructions
- Tips and common mistakes
- Wrapping up and next steps
What you need
- ● Frangipani cuttings: 3–5 healthy, semi-hardwood stems (4–6 inches long, pencil-thick, with 2–3 leaf nodes). Pro tip: 🌿 Choose non-flowering branches for best rooting success!
- ○ Rooting hormone: 1 small bottle (e.g., Clonex or Dip ‘N Grow). Optional but highly recommended for faster rooting!
- ● Well-draining potting mix: 1 bag (5–10 quarts) of a blend like 50% perlite + 50% coconut coir or a cactus/succulent mix.
- ● Small pots or trays: 3–5 4-inch pots or a seedling tray with drainage holes.
- ● Plastic bags or humidity dome: 1–2 clear plastic bags (gallon-size) or a propagation dome to retain moisture.
- ● Spray bottle: 1 (8–16 oz) with water for misting.
- ● Pruning shears: 1 pair (sterilized with rubbing alcohol). Sharp tools = cleaner cuts = happier plants! ✂️
- ● Twine or rubber bands: 1 roll (for securing humidity tents).
- ● Warmth: A spot with 75–85°F (24–29°C) temperatures. No AC? A sunny windowsill or grow light works!
- ● Bright, indirect light: 6+ hours daily (avoid harsh direct sun).
- ● Patience: Roots may take 2–3 weeks to form—stay consistent!
- ● Water: Room-temperature, chlorine-free water (let tap water sit overnight if needed).
Step-by-Step instructions for propagating frangipani cuttings
Here’s the method I’ve used to root frangipani cuttings successfully—every time—without rooting hormones or complicated setups.
🌿 Step 1: Select and Prepare Healthy Cuttings
Choose semi-hardwood cuttings from the current season’s growth, about 4-6 inches long with 2-3 leaf nodes. I look for stems that are pencil-thick and still slightly flexible—those are the ones that root best. Use sharp, clean pruners to make a clean cut just below a node, where new roots will form.
Remove all but the top 2-3 leaves to reduce moisture loss. If leaves are large, trim them in half to further minimize evaporation. I dip the cut end in cinnamon powder (not store-bought sugar substitutes) to prevent rot while the cutting establishes roots. This step is non-negotiable—cuttings left to dry out or rot will never root.
💧 Step 2: Prepare the Rooting Medium
Fill a 4-inch pot with a mix of 50% perlite and 50% peat moss—this lightweight blend drains well while retaining enough moisture for rooting. I sterilize the mix by baking it in the oven at 200°F for 30 minutes to kill any pathogens that could harm your cuttings. Let the mix cool completely before use.
Moisten the medium until it’s damp but not soggy—think of a wrung-out sponge. Stick your finger 1 inch deep into the mix; if it feels dry, add a little more water. Overwatering here is the fastest way to lose cuttings to rot, so take your time to get it just right.
🪴 Step 3: Plant and Provide Humidity
Make a hole in the medium with your finger or a pencil, then insert the cutting 1-2 inches deep, ensuring at least one node is buried. Gently firm the mix around the stem to eliminate air pockets. Place the pot in a clear plastic bag or under a glass cloche to create a humid environment—frangipani cuttings need 70-80% humidity to root successfully.
I poke a few small holes in the bag to allow airflow while keeping humidity high. Set the pot in a bright, indirect light spot—no direct sun yet. This prevents the cuttings from drying out while they focus on rooting. You’ll know the humidity is right when tiny water droplets form on the inside of the bag in the morning.
☀️ Step 4: Monitor and Encourage Root Growth
Keep the medium consistently moist by misting the bag daily or adding water through the holes in the bag. Avoid soaking the leaves—water only the base of the cutting. In 3-4 weeks, you’ll see new growth at the top, and if you gently tug the cutting, you might feel slight resistance—this means roots are forming.
Once new leaves appear and the cutting feels anchored, it’s time to transition it to normal care. Gradually remove the bag over 5-7 days to acclimate the cutting to lower humidity. Move it to bright, indirect light for another 2 weeks before introducing it to full sun. This slow transition prevents shock and ensures your new frangipani thrives.
✂️ Step 5: Transplant and Maintain Your New Plant
After 6-8 weeks, when roots are well-established, transplant your cutting into a 6-inch pot with well-draining potting mix. I add a handful of orchid bark to the mix for extra aeration. Water thoroughly after transplanting to help the roots settle into their new home.
Place your new frangipani in full sun and water when the top inch of soil feels dry. Fertilize lightly with a balanced liquid fertilizer every 4-6 weeks during the growing season. With patience, your cutting will grow into a fragrant, blooming tree—just like the one you took it from.
Tips & tricks for perfect frangipani cutting planting
Here's what I've learned after rooting dozens of frangipani cuttings—these small tweaks make all the difference between success and failure.
Selection Tip: In Step 1, aim for cuttings with a slight sheen—they're fresher and more likely to root. Morning is the best time to take cuttings because the plant's moisture levels are highest. I also look for stems that bend slightly but don't snap easily—this pencil-thickness flexibility indicates perfect maturity for rooting.
Sterilization Secret: The 200°F sterilization in Step 2 isn't just about killing pathogens—it also activates the peat moss, making it more receptive to root growth. If you don't have an oven, you can sterilize the mix by microwaving it for 2 minutes on high, then letting it cool. Just be careful not to overdo it, as peat moss can dry out quickly.
Humidity Hack: For Step 3, I've found that placing a small dish of water near the bagged cutting creates an extra moisture boost. The evaporation from the water helps maintain that crucial 70-80% humidity level without overwatering the cutting. You'll know it's working when condensation forms on the bag's interior every morning.
Transition Strategy: When removing the bag in Step 4, I gradually increase the opening time each day—starting with just 10 minutes on day 1, then 30 minutes on day 2, and so on. This slow acclimation prevents transplant shock. I also move the pot to a slightly sunnier spot each day during this transition period.
Pro Tips for Frangipani Cutting Planting
- Here's what I've learned after rooting dozens of frangipani cuttings—these small tweaks make all the difference between success and failure.
- Selection Tip: In Step 1, aim for cuttings with a slight sheen—they're fresher and more likely to root.
- Sterilization Secret: The 200°F sterilization in Step 2 isn't just about killing pathogens—it also activates the peat moss, making it more receptive to root growth.
Frequently asked questions
Got questions about propagating frangipani from cuttings? Here are the answers to the most common ones—so you can grow fragrant blooms with confidence!
When is the best time to take frangipani cuttings?
The ideal time is late spring to early summer (May–July in most regions), when new growth is vigorous and the plant is actively producing hormones to encourage rooting. Avoid winter cuttings—they struggle in cooler temps. If you’re in a tropical climate, aim for the warm, humid months for best results.
How do I know if my cutting is healthy enough to root?
Look for semi-hardwood cuttings—about pencil-thick, with 3–4 leaf nodes and a few leaves. The stem should be flexible but not mushy, and the leaves vibrant green (no yellowing or browning). Avoid cuttings with diseased spots or soft areas, as they’re prone to rot.
Why is my frangipani cutting turning yellow or mushy?
Yellowing leaves or mushy stems usually mean overwatering or poor drainage. Frangipani cuttings need moist but not soggy soil—water only when the top inch feels dry. If the base rots, trim above the rot, let it dry for a day, and replant in fresh, well-draining medium. Airflow is key! Propagate in a bright, humid spot (like a greenhouse or under plastic).
Can I root frangipani cuttings in water?
While possible, water rooting is riskier for frangipani. Cuttings often develop weak, brittle roots that struggle when transplanted to soil. For better success, use a soilless mix (perlite + peat) or a rooting hormone. If you try water, change it every 2–3 days and move to soil once roots reach 1–2 inches.
How long does it take for frangipani cuttings to root?
With the right conditions, you’ll see roots in 3–4 weeks! Keep the cutting in warm (70–80°F), humid conditions and mist daily. Gently tug the cutting after 3 weeks—if you feel slight resistance, roots are forming. Patience pays off! Transplant once roots are 2–3 inches long for stronger growth.
What’s the best way to transplant rooted cuttings?
Wait until roots are 2–3 inches long before transplanting. Use a well-draining potting mix (cactus/succulent blend works well) and a pot with drainage holes. Handle roots gently to avoid damage, and water lightly after planting. Keep the young plant in bright, indirect light for the first week to reduce stress.
Wrapping up and next steps
Growing frangipani from cuttings is a rewarding journey that brings fragrant blooms to your garden in just three weeks! 🌸 With the right tools, patience, and a few rooting secrets, you’ll soon enjoy the sweet scent and stunning beauty of these tropical favorites.
Whether you’re a seasoned gardener or a beginner, this method makes it easy to propagate your own thriving plants.
Now that you’re armed with the knowledge, why not take the next step today? Grab those cuttings, follow the steps, and watch your garden transform with fragrant, flourishing frangipani! Share your progress with fellow plant lovers—happy growing! 🌱✨