Orchid Care
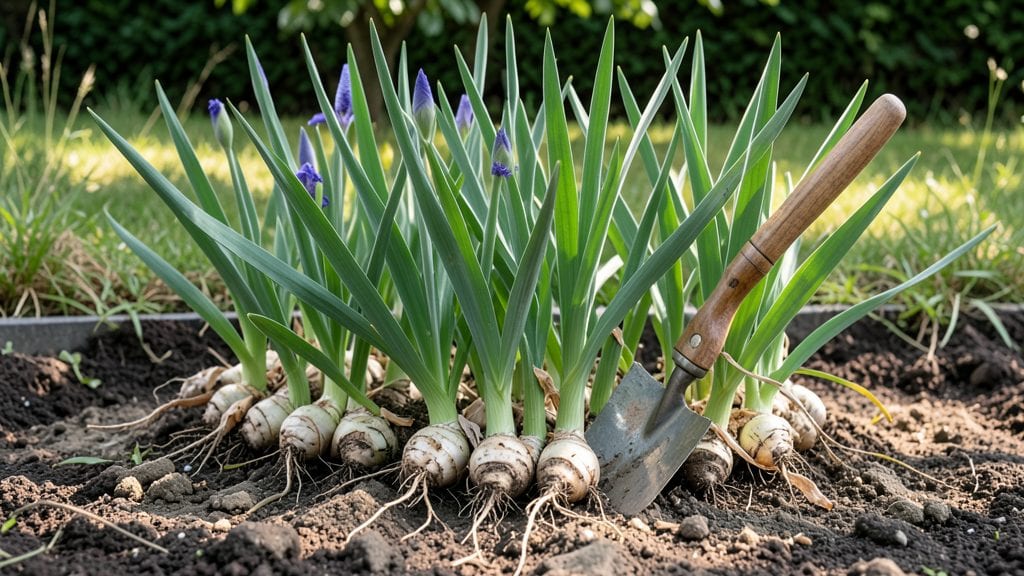
Planting iris roots in early fall or late winter unlocks those bold purple plumes that make every spring garden unforgettable. I learned the hard way—my first attempt with soggy, overwatered rhizomes lasted exactly one season before disappearing.
The secret lies in timing, soil prep, and knowing exactly where those thick, fleshy roots belong.
You’ll need healthy rhizomes with firm, plump roots and no soft spots, a sunny spot with well-draining soil, and a simple toolkit: gloves, a shovel, and maybe some compost.
The key is 6 inches of depth and 12 inches between plants—too shallow and they rot, too deep and they struggle. Most people mess up the spacing or watering, but once you get it right, irises reward you with decades of blooms.
After planting, keep the soil barely moist for the first month—no soggy ground, no bone-dry dirt. By late spring, you’ll see those first sword-like leaves, and by May, the blooms arrive like clockwork.
The best part? They multiply every year, giving you free plants to share with neighbors. Here’s how to nail every step without the trial-and-error headaches.
Fall planting gives roots time to establish before winter, while spring planting works if you’re in warmer zones. Either way, avoid rich fertilizer—irises hate it. The goal is happy roots, not hungry ones. Let’s get those rhizomes in the ground right.
📚 In This Guide
- What you need
- Instructions
- Tips and common mistakes
- Wrapping up and next steps
What you need
- ● Iris rhizomes: Healthy, firm roots (1–3 per hole, depending on size). Look for plump, white-to-tan rhizomes with visible growth points.
- ● Garden soil: Well-draining mix (amend with compost or sand if your soil is heavy clay or too dense). Aim for a 60/40 soil-to-amendment ratio.
- ○ Bone meal or phosphorus-rich fertilizer: 1–2 tbsp per planting hole (boosts root growth and blooms). Optional but recommended!
- ● Mulch: 2–3 inches of organic mulch (straw, wood chips, or shredded leaves) to retain moisture and suppress weeds.
- ● Garden trowel or shovel: For digging holes (6 inches deep, 12 inches apart for spacing).
- ● Pruning shears: To trim dead foliage or overgrown rhizomes before planting.
- ● Gloves: Heavy-duty to protect hands from thorns (some iris varieties have them!).
- ● Watering can or hose with a gentle nozzle: For post-planting hydration (avoid soaking the rhizomes).
- ● Measuring tape or ruler: To ensure proper spacing (critical for airflow and blooms!).
- ● Sunlight: Full sun (6+ hours daily). Partial shade = fewer blooms!
- ● Planting timing: Early spring (after last frost) or fall (6 weeks before first frost).
- ● pH level: Slightly acidic to neutral (6.0–7.0). Test your soil if unsure!
- ● Drainage: Avoid soggy spots—iris roots rot in waterlogged soil.
Instructions for planting iris roots like a pro
Here's how to plant iris roots for vibrant blooms that return year after year with minimal effort.
Prepare the Planting Site
Choose a location with full sun exposure—at least 6 hours of direct sunlight daily. Irises thrive in well-draining soil, so avoid low spots where water pools. If your soil is heavy clay, amend it with 2-3 inches of coarse sand or gravel mixed into the top 12 inches of soil. This ensures roots don’t suffocate in soggy conditions.
Use a garden fork to loosen the soil to a depth of 12 inches, breaking up any compacted layers. Irises need room to spread, so space planting holes 12-18 inches apart for clumps. If planting in a row, leave 2 feet between clumps to prevent overcrowding, which weakens blooms over time.
Soak the Iris Roots Before Planting
Before planting, soak the iris roots in lukewarm water for 1-2 hours. This rehydrates the rhizomes and helps them establish faster. Gently separate any tightly clustered roots with your fingers, but avoid cutting healthy tissue. Damaged roots will heal slowly and may rot if buried too deeply.
Check the rhizomes for signs of rot or soft spots—discard any that feel mushy or smell foul. Healthy roots should be firm with a slight woody texture. Once soaked, let them dry slightly for 30 minutes before planting. This prevents waterlogged soil around the roots, which can cause rot.
Position and Bury the Rhizomes Correctly
Place each rhizome in its hole with the top third exposed—this ensures it stays dry and prevents rot. The growing tip (a small bump) should face upward, while the roots fan out below. If the rhizome is too deep, it won’t bloom well, and if it’s too shallow, it may dry out.
Cover the roots with 1-2 inches of soil, leaving the top of the rhizome visible. Press the soil lightly around the base to secure it, but don’t pack it down tightly. Water the area gently to settle the soil without displacing the rhizome. Mulch with 1-2 inches of gravel or coarse sand around the base to improve drainage.
Water and Monitor Growth
Water the newly planted irises deeply once a week during the first 4 weeks to encourage root establishment. Avoid overhead watering—direct the hose at the base to keep foliage dry, which prevents fungal diseases. Once established, irises are drought-tolerant, so reduce watering to every 2-3 weeks unless your area experiences extreme heat.
Watch for new fan-shaped leaves to emerge in 4-6 weeks. These signal that the roots are settling in. By the following spring, you’ll see strong, healthy growth and the first blooms. Deadhead spent flowers by cutting the stems at the base to redirect energy into next year’s blooms.
Tips & tricks for perfectly planting iris roots
These simple yet effective tips will help you avoid common pitfalls and ensure your irises thrive for years to come.
The Sunlight Factor: While the instructions call for at least 6 hours of sunlight, I've found that irises planted in full sun (8+ hours) produce the most vibrant blooms and stronger stalks. If your location has intense afternoon sun, consider planting in a spot with morning sun and afternoon shade to prevent leaf scorch while still getting plenty of light.
Soil Preparation Insight: When amending heavy clay soil with 2-3 inches of coarse sand or gravel, I recommend mixing in a handful of compost as well. This gives the irises a nutrient boost while improving drainage. The compost helps establish roots faster, especially during the first critical 4 weeks after planting when roots are establishing.
Rhizome Positioning Secret: The instructions mention leaving the top third of the rhizome exposed, but I've noticed that in very dry climates, you might want to expose slightly more (up to half) to prevent rot. Conversely, in humid areas, keeping just the top third exposed is ideal. Always check the growing tip is facing upward—this is non-negotiable for proper growth.
Watering Wisdom: During the first 4 weeks, I've learned that deep watering once a week is ideal, but timing matters. Water in the early morning so the foliage has time to dry completely before evening. This simple adjustment prevents fungal diseases that can kill newly planted irises. After establishment, I find that watering every 2-3 weeks works beautifully unless we're in a heatwave.
Pro Tips for Planting Iris Roots
- These simple yet effective tips will help you avoid common pitfalls and ensure your irises thrive for years to come.
- The Sunlight Factor: While the instructions call for at least 6 hours of sunlight, I've found that irises planted in full sun (8+ hours) produce the most vibrant blooms and stronger stalks.
- Soil Preparation Insight: When amending heavy clay soil with 2-3 inches of coarse sand or gravel, I recommend mixing in a handful of compost as well.
Frequently asked questions
Got questions about planting iris roots? You’re not alone!
Here are some of the most common concerns—and their solutions—to help you grow stunning irises with confidence.
When is the best time to plant iris roots?
The ideal window is late summer to early fall (August–October), when roots are dormant but still active. Spring planting is possible, but irises thrive best when established before winter. If you must plant in spring, water deeply and mulch to protect roots as they settle in.
How deep should iris roots be planted?
Plant rhizomes (thick roots) shallowly—just 1–2 inches deep—with the top third exposed to sunlight. Burying them too deep suffocates growth, while leaving them too shallow risks rot or frost damage. Think of it like tucking them into a cozy blanket, not a burial.
Can I plant iris roots in containers instead of the ground?
Containers work well for small spaces or cold climates. Use a well-draining mix (like 60% potting soil + 30% perlite + 10% compost) and ensure pots have drainage holes. Repot every 2–3 years to refresh the soil, and place containers in full sun for best blooms.
Why aren’t my iris roots growing after planting?
Common culprits include overwatering (roots rot easily), poor drainage, or shady spots. Check soil moisture—it should stay evenly moist but not soggy. If leaves appear yellow or mushy, reduce water and improve airflow. Patience helps too: irises may take 1–2 years to fully establish.
Do iris roots need fertilizer, and if so, when?
Feed lightly in early spring (as new growth emerges) with a balanced, low-nitrogen fertilizer (like 5-10-10). Avoid fertilizing in fall—it encourages tender growth that won’t survive winter. For organic options, top-dress with compost or bone meal in spring for a gentle boost.
How do I divide and replant iris roots?
Divide irises every 3–4 years in early summer (June–July). Dig up clumps, separate rhizomes with 3–4 healthy fans (leaves) each, and trim old roots. Replant immediately or store in a cool, dry place for a few days. Discard any soft, mushy rhizomes—they’re likely diseased.
Wrapping up and next steps
Planting iris roots is your ticket to vibrant, long-lasting blooms that’ll steal the show in your garden! 🌸 With the right timing, soil prep, and care, you’ll enjoy stunning spring color year after year.
Now that you’re armed with the secrets to success, it’s time to roll up your sleeves and get growing—your irises are waiting for their big debut!
Next step: Mark your calendar for early fall (or late winter in mild climates) and start digging! For extra confidence, snap a photo of your iris roots before planting—it’s a great way to track progress and celebrate your blooming triumphs. Happy gardening! 🌱✨