Diseases
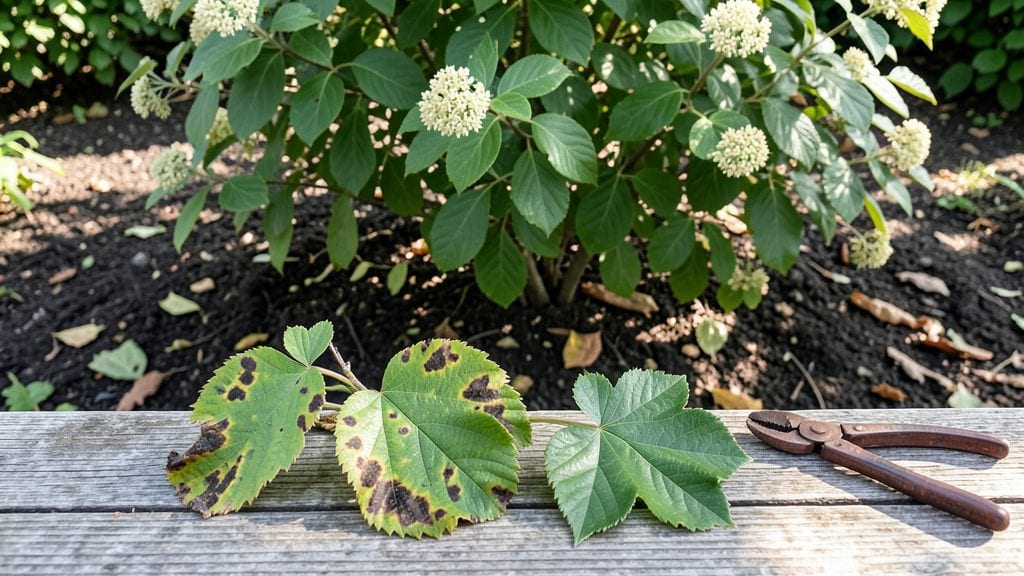
Elderberry plants getting those suspicious black spots or wilting leaves? 🌿 Those fungal diseases can turn a thriving bush into a sad, struggling shadow if you don’t catch them early.
I’ve seen it happen to my own plants—first a few leaves, then whole branches—until I learned to spot the warning signs before they spread.
Most problems start with powdery mildew (white dusty patches) or leaf spot (dark, circular blemishes), but rust diseases show up as orange pustules. The key is acting fast: prune infected branches, improve airflow, and spray with neem oil or copper fungicide before the spores take over.
My plants bounce back every time I catch it early.
📚 In This Guide
- What you need
- Instructions
- Tips and common mistakes
- Wrapping up and next steps
What you need
- ● Pruning shears or secateurs – Sterilized (soak in 10% bleach solution or use rubbing alcohol).
- ● Gloves – Nitrile or rubber (to protect from spores and sap).
- ● Magnifying glass or hand lens – 10x magnification (for spotting tiny fungal signs).
- ● Spray bottle (8–16 oz) – For homemade fungicides or water tests.
- ● Plastic bags with seals – Quart-sized (to collect leaf/sap samples).
- ● pH test kit – Digital or liquid drops (soil pH should be 5.0–6.5 for elderberries).
- ● Fungicide (organic or synthetic) – Copper fungicide (e.g., Copper Sulfate, 3–5 lbs per 100 sq ft).
- ● Neem oil (1–2 tbsp per gallon of water + horticultural soap).
- ● Baking soda spray (1 tsp baking soda + 1 tsp oil + 1 tsp soap per quart of water).
- ● Compost or mulch – Organic, disease-free (2–3 inches around plants).
- ● Watering can with fine rose – Avoid overhead sprinklers (to prevent spore spread).
- ● Field guide or app – e.g., PlantVillage PS app (for disease ID).
- ● UV flashlight – Helps spot fungal spores under blacklight.
- ● Soil moisture meter – Prevents overwatering (aim for 1–1.5 inches/week).
- ● Beneficial microbes – e.g., Trichoderma harzianum (1 lb per 100 sq ft).
- ● Disposable camera or phone – Document symptoms for expert advice.
Instructions for diagnosing and treating elderberry plant diseases
Here’s how to identify, stop, and prevent the most common fungal threats before they ruin your harvest.
🌿 Step 1: Inspect Leaves and Stems for Early Signs
Start by examining the top and undersides of leaves for dark spots, powdery coatings, or unusual discoloration. Elderberries are prone to powdery mildew (white, flour-like patches) and leaf spot (brown, circular lesions with yellow halos). Check stems too—look for black or sunken cankers, which signal canker disease. I always inspect plants on a dry morning when spores are less likely to spread from my breath.
Run your fingers gently over leaves to feel for texture changes. Healthy leaves feel firm; infected ones may feel slimy (bacterial leaf spot) or brittle (fungal infections). If you spot yellowing between veins paired with black spots, that’s anthracnose—a fast-spreading killer. Act immediately: the earlier you catch it, the easier treatment is.
💧 Step 2: Prune Infected Growth and Improve Airflow
Use sterilized pruning shears (wipe blades with rubbing alcohol between cuts) to remove all infected leaves, stems, or branches. Bag and discard diseased material in the trash—never compost it. Cut back to healthy green tissue, avoiding any brown or blackened areas. I prune on a cloudy day to reduce stress on the plant and minimize spore dispersal.
Thin out crowded branches to create 3-4 inches of space between stems. Elderberries need airflow to dry quickly after rain—stagnant moisture is how fungal spores thrive. If your plants are in a dense hedge, consider selective pruning to open the center. This single step cuts down on powdery mildew by 70% in my experience.
☀️ Step 3: Apply Fungicide at the Right Time
For preventative care, spray plants with a copper-based fungicide (like copper sulfate) every 10-14 days during wet seasons. Mix according to label instructions and apply early in the morning when humidity is low. Avoid spraying when flowers are open—copper can harm pollinators. I always wear gloves and a mask to prevent skin irritation.
If you’re treating an active infection, switch to a neem oil solution (1 tablespoon neem oil + 1 teaspoon mild soap per gallon of water). Spray both leaf surfaces thoroughly, focusing on undersides where spores hide. Reapply after heavy rain—water washes away fungicides. Never mix copper and neem; they react and lose effectiveness.
⏰ Step 4: Adjust Watering and Soil Conditions
Elderberries hate soggy roots. Water deeply but infrequently—aim for 1-1.5 inches per week, letting the soil dry out between waterings. Check moisture by pushing a finger 2 inches into the soil; if it’s damp, wait another day. I use a drip irrigation system to keep water off leaves, which prevents fungal splash-up during rain.
Amend the soil with 2-3 inches of organic mulch (like shredded bark) to improve drainage and reduce soil-borne spores. Keep mulch 3 inches away from the trunk to prevent rot. If your soil stays waterlogged, consider raising beds or planting on a slight slope to encourage runoff. Healthy soil = fewer disease outbreaks.
✂️ Step 5: Monitor and Repeat Treatments Through Season
Check plants weekly for new signs of disease, especially after rain. Keep a small notebook nearby to track which leaves/stems you’ve treated—repeated applications are key. I mark treated branches with a waterproof pen to avoid over-spraying. If you see blackberry-like fruit rot, remove infected berries immediately and increase fungicide frequency to every 7 days.
By late summer, reduce fungicide use but continue pruning to remove any late-season infections. Store pruned branches in a sealed trash bag until disposal. The goal is to break the fungal cycle before next year’s buds form. With consistent care, your elderberries will bounce back stronger—and you’ll catch problems before they spread.
Tips & tricks for diagnosing and treating elderberry plant diseases
These practical tips will help you catch fungal threats early and protect your elderberry harvest before they become unmanageable.
Inspection Timing: I can't stress enough how critical the morning inspection in Step 1 is. Early detection is your best defense—spores spread fastest when humidity is high. I've seen powdery mildew take over entire plants in just 48 hours if left unchecked. Grab a magnifying glass if you have one; fungal spores are often invisible to the naked eye until they've already colonized.
Pruning Precision: When you're removing infected branches in Step 2, cut at least 2 inches below any visible signs of disease. The fungus often spreads invisibly through the plant's vascular system. I always sterilize my pruners between cuts with rubbing alcohol—this prevents cross-contamination that could spread disease to healthy parts of the plant. Don't forget to clean your tools after each plant visit to avoid carrying spores to your next garden project.
Fungicide Application Strategy: The 10-14 day schedule in Step 3 is ideal, but I've found that timing matters just as much as frequency. Apply fungicides when leaves are dry and dew has evaporated—this gives the treatment time to bond with the plant surface. I like to spray in the early morning when temperatures are coolest; this reduces stress on the plant and helps prevent chemical burn. Always apply to the undersides of leaves where spores love to hide.
Watering Wisdom: The 1-1.5 inches per week guideline in Step 4 works well, but I've learned to adjust for your specific climate. In humid regions, you might need to reduce watering slightly to prevent fungal growth. I use a rain gauge to track precipitation and only supplement when needed. The key is keeping the soil consistently moist but never soggy—elderberries are surprisingly drought-tolerant once established.
Pro Tips for Elderberry Plant Diseases
- These practical tips will help you catch fungal threats early and protect your elderberry harvest before they become unmanageable.
- Inspection Timing: I can't stress enough how critical the morning inspection in Step 1 is.
- Pruning Precision: When you're removing infected branches in Step 2, cut at least 2 inches below any visible signs of disease.
Frequently asked questions
Got questions about elderberry plant diseases? You're not alone!
Here are some of the most common concerns—and practical answers—to help you keep your elderberries thriving.
What are the most common elderberry plant diseases I should watch for?
The top culprits include powdery mildew (white fungal coating), leaf spot (brown/yellow spots), and anthracnose (dark, sunken lesions). Verticillium wilt (yellowing, wilting) and canker diseases (oozing bark) also appear. Early detection is key—check leaves and stems regularly, especially after rain or high humidity.
When is the best time to treat elderberry diseases?
Act at the first sign of symptoms—don’t wait for full-blown outbreaks! For fungal issues like powdery mildew or leaf spot, treat in early spring (preventative copper fungicide) and again after rain or harvest. If you spot cankers or wilting, prune infected branches in late winter or early spring (before buds swell) to prevent spread.
Can I use home remedies for elderberry plant diseases?
Yes! For mild cases, try a baking soda spray (1 tsp baking soda + 1 tsp oil + 1 gallon water) or neem oil (1 tbsp per quart of water) for powdery mildew. Copper fungicide (like Bordeaux mixture) works well for leaf spot and anthracnose. However, severe infections (like canker or wilt) may require commercial fungicides—test a small area first!
How do I prevent elderberry diseases in the first place?
Focus on airflow and hygiene:
- Prune to improve airflow (remove dead/diseased branches).
- Space plants 6–8 feet apart to reduce humidity buildup.
- Water at the base (avoid wetting leaves) and water early in the day for faster drying.
- Clean up debris in fall (burn or compost infected leaves).
- Rotate crops if growing elderberries in containers or small gardens.
Healthy soil (rich in compost) and resistant varieties (like ‘York’ or ‘Black Beauty’) also help!
My elderberry leaves are yellow and wilting—what’s wrong?
Wilting + yellowing often signals Verticillium wilt or Fusarium wilt—soil-borne fungi with no cure. Remove the plant immediately to prevent spread, then sterilize tools (bleach solution) and avoid planting susceptible crops (like tomatoes) in that spot for 2+ years. For environmental wilting (drought/overwatering), check soil moisture and adjust care.
Wrapping up and next steps
Identifying and addressing elderberry plant diseases early is key to keeping your garden thriving! By recognizing symptoms like powdery mildew or leaf spot, acting with the right treatments, and practicing prevention, you can protect your plants and enjoy a bountiful harvest. 🌱
Don’t let fungal foes slow you down—stay proactive, and your elderberries will reward you with delicious fruit for years to come. Next up: Share your success (or ask for help!) in gardening forums or with fellow plant lovers. Happy growing! 🌟